I look forward to those chocolate oranges every Christmas season – they’re one of those simple pleasures in life. I’ve been eyeballing my late gramma’s brownie recipe for a while now, and when I spotted chocolate oranges back on the shelves, I thought… why not combine the two?
I’m so glad I did! These chocolate orange brownies came out perfectly chocolatey and chewy with just the right amount of orange flavor. The batter even smells exactly like a Terry’s Chocolate Orange, yum!!
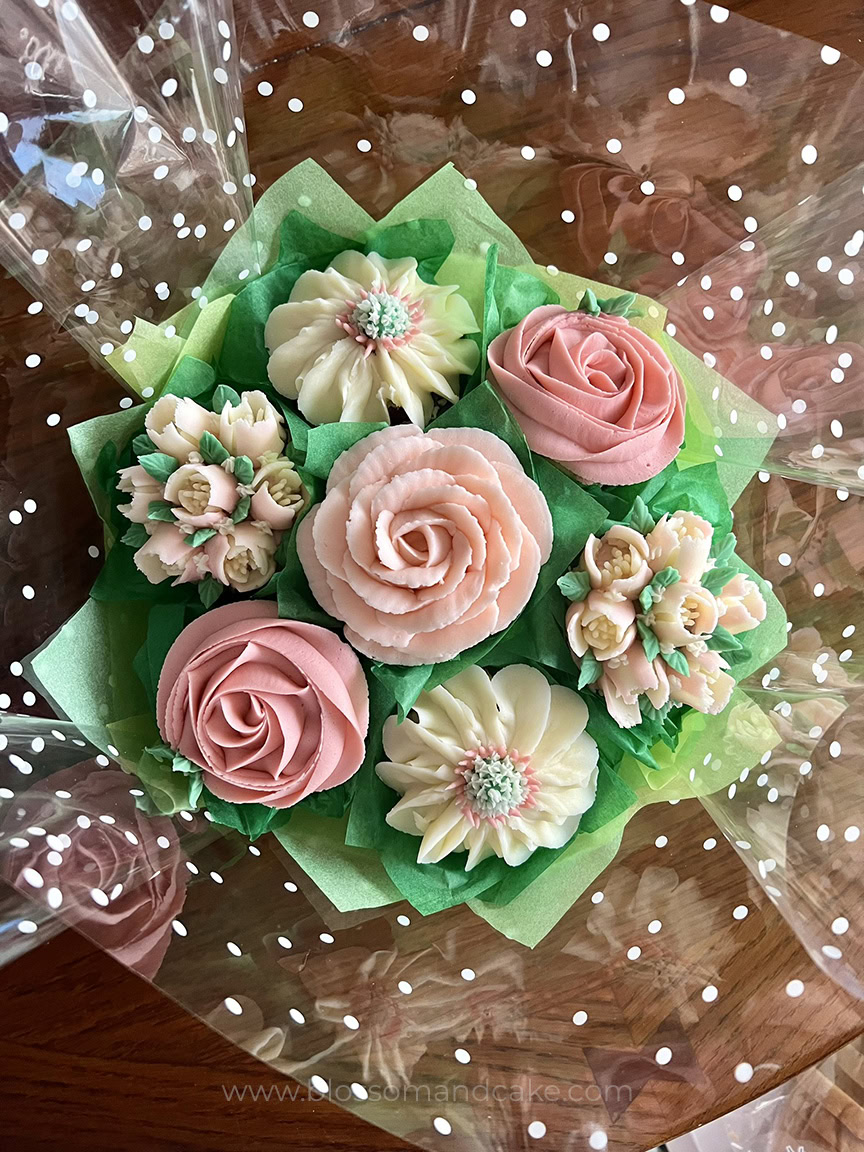
Whether you dress them up with buttercream decorations or keep them simple with a chocolate drizzle, these brownies are perfect for holiday treat boxes, cookie swaps, or just enjoying at home.

Table of Contents
Why You’ll Love These Chocolate Orange Brownies
Perfectly chewy texture: Dense and rich with a satisfying chew – not dry or cakey, just the right balance.
Chocolate orange deliciousness: The fresh orange zest adds brightness without overwhelming the chocolate.
Grandma-approved recipe: This is a tried-and-true brownie base that’s been made for years.
Simple ingredients: No fancy equipment or techniques – just straightforward mixing and baking.
Ingredients You’ll Need
Here are the ingredients for these brownies – nothing complicated, just pantry staples plus fresh oranges.

Ingredients:
- unsalted butter
- granulated sugar
- large eggs
- vanilla extract
- orange zest (from 2-3 oranges)
- cocoa powder
- all-purpose flour
- baking powder
- teaspoon salt
About the Cocoa Powder:
For this recipe, I used a high-fat cocoa powder (22-24% fat) because I splurged on the fancy stuff – but you absolutely don’t need expensive cocoa for these to be delicious. Any cocoa powder works great here, whether it’s Dutch-processed or natural.
If you’re using regular cocoa and want extra chocolatey goodness, fold in about ½ cup of chocolate chips or chunks before baking.
How to Make Chocolate Orange Brownies
These brownies come together quickly with just one bowl and basic pantry ingredients. The key to getting that perfectly chewy texture is not overmixing the batter and watching your bake time closely – you want them slightly underdone in the center.

Step 1: Preheat and prep
Preheat your oven to 350°F (175°C). Line an 8×8 inch square pan with parchment paper, leaving some overhang on the sides for easy removal. To do this, lightly grease the pan with Crisco (optional, but helps the parchment stick), then cut your parchment wide enough to hang over two opposite sides by a few inches and press it into the pan.
Step 2: Melt the butter
Melt the butter in a small heatproof bowl (microwave or stovetop works). Let it cool for a few minutes so it’s warm but not hot.
Step 3: Mix butter and sugar
Add the cooled butter and sugar to your mixing bowl and mix until combined.


Step 4: Mix wet ingredients
Add the eggs one at a time, whisking well after each addition (30 seconds) – the mixture should look smooth and glossy. Stir in the vanilla extract.


Step 5: Add the orange zest
Stir in the orange zest until evenly distributed throughout the batter.

Step 6: Add dry ingredients
Sift the cocoa powder, flour, baking powder and salt directly into the bowl. Gently mix or fold everything together with a spatula until just combined – you should see no more dry streaks. Try not to overmix or you’ll get cakey brownies instead of fudgy ones.


Step 7: Bake
Pour the batter into your prepared pan and smooth the top. Bake for 25-30 minutes (depending on pan size). The edges should be set and pulling away slightly from the pan, but the center should still look a bit soft and jiggly – it will continue cooking as it cools. A toothpick inserted in the center should come out with moist crumbs, not clean.


Step 8: Cool
Let the brownies cool completely in the pan (or pop them in the fridge for 20-30 minutes to speed this up). They need to be fully cool before decorating or cutting – see decorating ideas below.

Cut and decorate: Use the parchment overhang to lift the brownies out of the pan. You can either decorate the whole slab now before cutting, or cut into squares first (wiping the blade between cuts for clean edges) and then decorate individual pieces – whichever you prefer.

Decorating Ideas
These brownies are really good on their own, but here are a couple ways to dress them up:
Simple & elegant: Vanilla bean buttercream with fresh orange zest
Classic chocolate: Candy melt or chocolate drizzle with sprinkles; I used “joyful and jolly” sprinkle medley from Sweetapolita
With nuts: Chocolate drizzle with chopped almonds or cashews
How would you decorate these brownies? Let me know in the comments!


Tips for Perfect Chewy Brownies
Don’t overbake. This is the most important tip. If you bake too long, your brownies will be cakey instead of fudgy and chewy. It’s always better to slightly underbake than overbake. Start checking at 25 minutes, and if the edges are set and the center is just slightly jiggly, pull them out. They’ll firm up as they cool.
Let them cool completely. I know it’s tempting to cut into warm brownies fresh out of the oven, but they need time to set up. Brownies will finish their cooking process as they cool, not to mention they are WAY easier to cut when fully set! Plus, you need them completely cool before decorating.
Use parchment paper. The overhang makes lifting the brownies out foolproof. No struggling with a spatula trying to pry corner pieces out.
Make ahead: These actually taste better the next day once the flavors have melded. You can bake them a day ahead.
FAQs
Can I use a different pan size? This recipe is designed for an 8×8 inch pan to make thick brownies. If you use a 9×9, they’ll be thinner and will need less baking time – check them at 25 minutes. A 9×13 pan will make very thin brownies that bake in about 20 minutes.
Can I use orange extract instead of zest? Yes! You can substitute the zest with ½ teaspoon of orange extract.
Can I add chocolate chips? Yes! Fold in ½ cup of chocolate chips or nuts after you add the dry ingredients.
How should I store these? Store in an airtight container at room temperature for up to 5 days, or refrigerate for up to a week.
Can I freeze them? Yes! Store in an airtight container (or wrap individual brownies in plastic wrap) and freeze for up to 3 months. Thaw at room temperature.
If you make these chocolate orange brownies, I’d love to see them! Tag me on Instagram @alchemy.sweets or leave a comment below!
Looking for more holiday decorating ideas? Check out my other holiday ideas.
Happy baking!

Easy Chewy Chocolate Orange Brownies
Equipment
- stand or hand mixer
- measuring spoons and cups
- Mixing Bowls
- zester
- spatula
- parchment paper
- square baking pan
Ingredients
- ¾ cup unsalted butter melted
- 1 ½ cup sugar
- 3 eggs
- 2 tsp vanilla extract or vanilla bean paste
- 1-2 tsbp fresh orange zest
- ¾ cup cocoa powder
- ½ tsp baking powder
- ½ tsp salt
- ¾ cup flour
Optional Toppings
- candy melts or chocolate
- fresh orange zest
- nuts
- buttercream
- sprinkles
Instructions
- Preheat oven to 350°F (175°C). Line an 8×8 inch square pan with parchment paper.
- Melt butter and let cool slightly. Mix in sugar until combined.¾ cup unsalted butter, 1 ½ cup sugar
- Add eggs one at a time, mixing well after each. Stir in vanilla extract.3 eggs, 2 tsp vanilla extract or vanilla bean paste
- Stir in orange zest until evenly distributed.1-2 tsbp fresh orange zest
- Sift cocoa powder, flour, and salt. Gently mix or fold with a spatula until just combined with no dry streaks.¾ cup cocoa powder, ½ tsp salt, ¾ cup flour, ½ tsp baking powder
- Pour batter into prepared pan and smooth the top.
- Bake 25-30 minutes until edges are set but center is slightly soft. Do not overbake.
- Cool completely in pan.
- Lift brownies out using parchment overhang. Decorate as you wish, or cut into squares.
Notes
- Doneness test: Edges should be set and pulling slightly from the pan, center should look soft and a toothpick should come out with moist crumbs (not clean). They’ll firm up and cook further as they cool.
- For extra fudgy brownies: Err on the side of underbaking. Check at 25 minutes – if edges are set, pull them out even if the center seems underdone.
- Don’t overbake: If you bake too long, the brownies will be more cakey instead of fudgy and chewy. Better to slightly underbake than overbake.
- Pan size: This recipe is for an 8×8 inch pan. If using a 9×9, reduce baking time by 3-5 minutes.
- Decorating options: You can decorate the whole slab before cutting, or cut first and decorate individual squares if you prefer.
- Storage: Store in an airtight container at room temperature for up to 5 days, or refrigerate for up to a week.
- Make ahead: These actually taste better the next day once the flavors have melded. You can bake them a day ahead.
- Cocoa powder: I used a high-fat cocoa powder, but any cocoa works great here. If you’re using regular cocoa and want extra chocolate richness, fold in ½ cup chocolate chips before baking.