*post was written under previous alias; Blossom & Cake
Christmas cupcakes are one of those things that look way more complicated than they actually are. These Christmas wreath cupcake designs? They’re surprisingly simple, but they still look festive and put-together enough that people will think you tried really hard.
I’m going to show you five different wreath styles using basic piping techniques. Some are easier than others, but they’re all totally doable – even if you’ve never decorated a cupcake before. Perfect for holiday parties, bake sales, or just making your kitchen feel more festive while you procrastinate on actual gift wrapping.
Let’s get started!
Quick Look: Your 5 Wreath Styles
Before we dive in, here’s what we’re making:
- Basic Wreath – Classic stars with berry accents (perfect for beginners!)
- Ruffle Wreath with Bow – Soft, romantic shells with a statement ribbon
- Crisscross Wreath – Textured and dimensional with a woven look
- Frosty Swirl Wreath – Elegant curves with a dusting of “snow”
- Wreath and Pinecone – The showstopper centerpiece design


Table of Contents
Starting Right: Creating Your Canvas
Every beautiful wreath needs a smooth base to shine. You’ve got two options here:
Option 1: The Palette Knife Method
Simply ice your cupcake with a palette knife for a dome-topped classic look. Easy, forgiving, and totally works.
Option 2: The Flat-Top Method
Want that bakery-perfect flat surface? Use any large piping tip (I love the 1M) or a coupler to squeeze a generous mound of white buttercream onto the center of your cupcake. Then flip it over onto parchment or wax paper and press down gently. Let it set for a few minutes, peel away the paper, and boom—perfectly flat canvas ready for decorating.
Pro tip: All of these designs use medium consistency buttercream. If you need the recipe, try this one here or a buttercream with Swiss meringue.


Step-by-Step How to Create Christmas Wreath Cupcakes
The below cupcakes all use a medium consistency buttercream. You can find the recipe here.
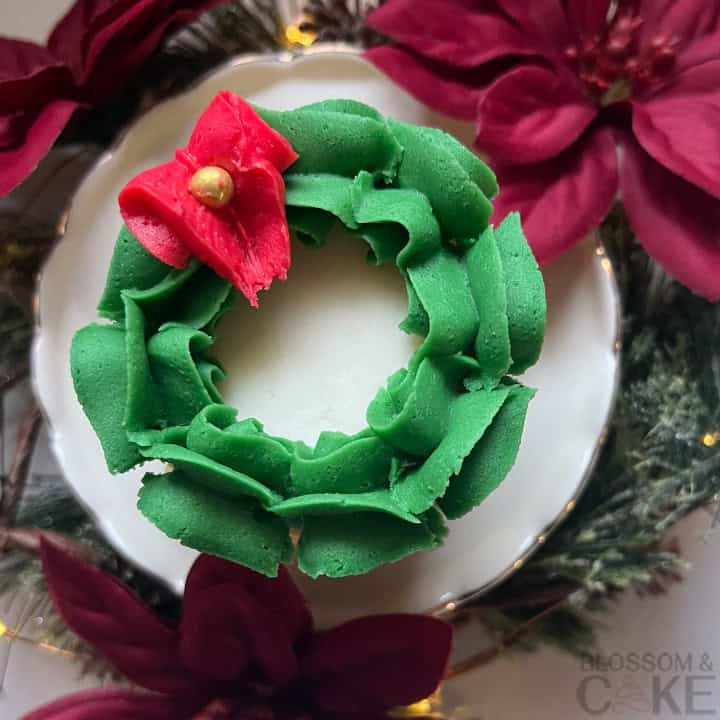
Design #1: Basic Wreath
Best for: Your first attempt, or when you need to decorate a dozen cupcakes quickly
What You’ll Need:
- Piping tips: Wilton 32, Wilton 18, Wilton 1
- Piping bags (one for each color)
- Buttercream: dark green, light green, and red
- Sprinkles (optional—use these instead of piping berries if you’re short on time)
How to Pipe It:
- Pipe the first star. Position your Wilton 32 tip with dark green buttercream slightly above the cupcake. Apply medium pressure to form a star, then release and pull away.
- Continue around the perimeter. Move the tip beside your previous star and pipe another one. Keep going until you’ve created a circle of stars around the cupcake.
- Add lighter green accents. Switch to light green with the Wilton 18 tip and pipe smaller stars randomly between the larger ones.
- Pipe red berries. Use red buttercream with the Wilton 1 tip to add small dots around the wreath.
- Finish with sprinkles. Add any festive sprinkles you like, or skip the piped berries entirely and just use sprinkles instead.
Want to go fancy? Add a candy melt snowflake to the center! Check out my Winter Wonderland Cupcakes to see how I make the snowflakes!


Design #2: Ruffle Wreath with Bow
Best for: When you want something a little fancier and more elegant
The shell piping creates soft, flowing ruffles that look delicate and sophisticated. And that bow? It’s easier than it looks and makes the whole cupcake feel special.
What You’ll Need:
- Piping tips: Wilton 2D, Wilton 70
- Piping bags (one for each color)
- Buttercream: green and red
- Sprinkles
Step-by-Step:
- Pipe the first shell. Position the Wilton 2D tip with green buttercream at the edge of the cupcake, hovering just above the surface. Apply medium pressure until the buttercream puffs up and the tip rises.
- Complete the shell. While still squeezing, draw the tip downward toward the cupcake, pause, then release pressure and pull toward yourself to create a tapered tail.
- Continue piping shells. Start the next shell right at the tail of the previous one and repeat around the entire cupcake.
- Close the circle. When you reach the end, tuck the final tail around your first shell so it flows together seamlessly.
- Position the bow. Switch to red buttercream with the Wilton 70 tip. Hold the tip sideways (like a beak) with the small V facing upward, and position it at a 40-degree angle where your first and last shell meet.
- Pipe the ribbon. Using slow, steady pressure, pipe ripples in a back-and-forth motion, layering 2-3 times to build texture.
- Taper the bow end. Pull the tip down toward the center of the cupcake while releasing pressure, then pull away cleanly.
- Add the finishing touch. Place a sprinkle in the center of your bow.


Design #3: Crisscross Wreath
Best for: Adding texture and visual interest—this one photographs really well
This design gives you that woven, dimensional look that makes people look twice. It’s got movement and texture, and it’s surprisingly simple once you get the rhythm down.
What You’ll Need:
- Piping tip: Wilton 32
- Piping bag
- Buttercream: green
- Sprinkles
Step-by-Step:
- Pipe the first line. Position your Wilton 32 tip just above the cupcake along the perimeter. Apply medium pressure and pipe a short line, pulling downward and slightly inward.
- Taper the end. Release pressure, lower the tip, and pull toward yourself to create a tapered tail.
- Create the crossover. Align your tip alongside the upper section of that first line and pipe a second line that crosses over the tail of the first—this time pulling downward and slightly outward.
- Continue the crisscross pattern. Keep alternating these crossed lines all the way around the cupcake.
- Close the wreath. When you reach the end, tuck that final tail into your first line so it looks continuous.
- Add sprinkles. Finish with your favorite festive sprinkles.
Helpful tip: If you want to keep things neat, lightly mark a circle on your base with a toothpick before you start piping—it gives you a guide to follow!


Design #4: Frosty Swirl Wreath
Best for: When you want elegant and a little bit fancy
The looping swirls catch the light beautifully, and that dusting of powdered sugar? Instant winter wonderland vibes.
What You’ll Need:
- Piping tips: Wilton 32, Wilton 1
- Piping bag
- Buttercream: green and red
- Powdered sugar (for the frosty effect)
Step-by-Step:
- Pipe the first swirl. Position your Wilton 32 tip slightly above the cupcake and apply medium to hard pressure to create a generous shell that fans out.
- Create the loop. While piping, lift the tip up and loop it clockwise over the shell you just made.
- Taper the end. Release pressure, lower the tip, and pull toward yourself to finish.
- Reverse direction. Start your next shell right at the tail of the previous one, but loop counterclockwise this time.
- Continue alternating. Keep switching between clockwise and counterclockwise loops as you work around the cupcake.
- Close the wreath. For the final shell, curve the tail around your first shell instead of pulling toward yourself.
- Add berries. Switch to red buttercream with the Wilton 1 tip and pipe small dots scattered around the swirls.
- Make it frosty. Gently sift powdered sugar over the entire cupcake for that fresh snowfall look.


Design #5: Wreath and Pinecone
Best for: When you want to show off a little (totally worth it)
A three-dimensional pinecone sitting in the center of your wreath? This is your showstopper cupcake. It takes a bit more time, but the payoff is impressive.
What You’ll Need:
- Piping tips: Wilton 10, Wilton 81, Wilton 32, Wilton 1
- Coupler
- Piping bags (one for each color)
- Buttercream: brown, red, and green (mix red and green to create brown if needed)
- Sprinkles (gold round ones look especially nice)
Step-by-Step:
- Create the cone base. With brown buttercream and a Wilton 10 tip, position the tip in the center of a bare cupcake slightly above the surface. Apply firm pressure—the tip will rise as buttercream mounds up.
- Shape the cone. Continue lifting the tip while gradually releasing pressure to create a conical shape about 2 inches tall.
- Finish the top. Once you reach the height you want, move the tip in a tight circular motion and pull away.
- Start the scales. Switch to the Wilton 81 tip with brown buttercream. Push the tip into the top of the base cone, angling it at 90 degrees with the curve pointing inward.
- Pipe the first scale. Apply firm, steady pressure to create the scale, then release before pulling the tip away.
- Build rows of scales. Continue creating scales in rows, working downward toward the base. Make each row slightly longer and fan them outward more by curving the tip as you go.
- Pipe the wreath. With green buttercream and the Wilton 32 tip, pipe a basic star wreath around the bottom of the pinecone (just like Design #1).
- Add berries. Use red buttercream with the Wilton 1 tip to pipe small dots around the wreath.
- Finish with sprinkles. Add your preferred sprinkles—gold round ones are especially pretty here.


Troubleshooting Tips
My buttercream is too soft and won’t hold shape:
Pop it in the fridge for 10-15 minutes to firm up. Medium consistency is key—it should hold a peak but still pipe smoothly.
My stars/shells look lumpy:
Make sure you’re applying steady, even pressure. Jerky movements create lumpy buttercream. Also check that your tip isn’t clogged.
I can’t get my bow to look right:
The angle matters! Keep that Wilton 70 tip at about 40 degrees and move slowly. Speed is the enemy of pretty bows.
My wreath looks sparse:
Layer in those lighter green accents and don’t be shy with the “berries” or sprinkles. Fuller is better when it comes to wreaths!
Let’s Make Some Magic
And there you have it—five different ways to turn a simple cupcake into a festive masterpiece. Start with the Basic Wreath to build your confidence, then work your way up to that showstopping Pinecone design when you’re ready to really wow your guests.
The beautiful thing about these designs? They all use the same basic piping techniques, just combined in different ways. Master one, and the others become so much easier.
Want to see these wreaths in action? I put together a video tutorial showing all five designs from start to finish. Watch the full video here and pipe along with me!
Now grab your piping bags, crank up the Christmas music, and let’s make your kitchen smell like buttercream and holiday magic. And when everyone asks where you ordered these gorgeous cupcakes? Just smile and say “I made them.”
Because you absolutely did.
Which wreath design are you trying first? Drop a comment below and let me know! And if you make any of these, I’d LOVE to see your creations—tag me on Instagram @alchemy.sweets so I can cheer you on!
Pin this for later!

Happy decorating! 🎄✨