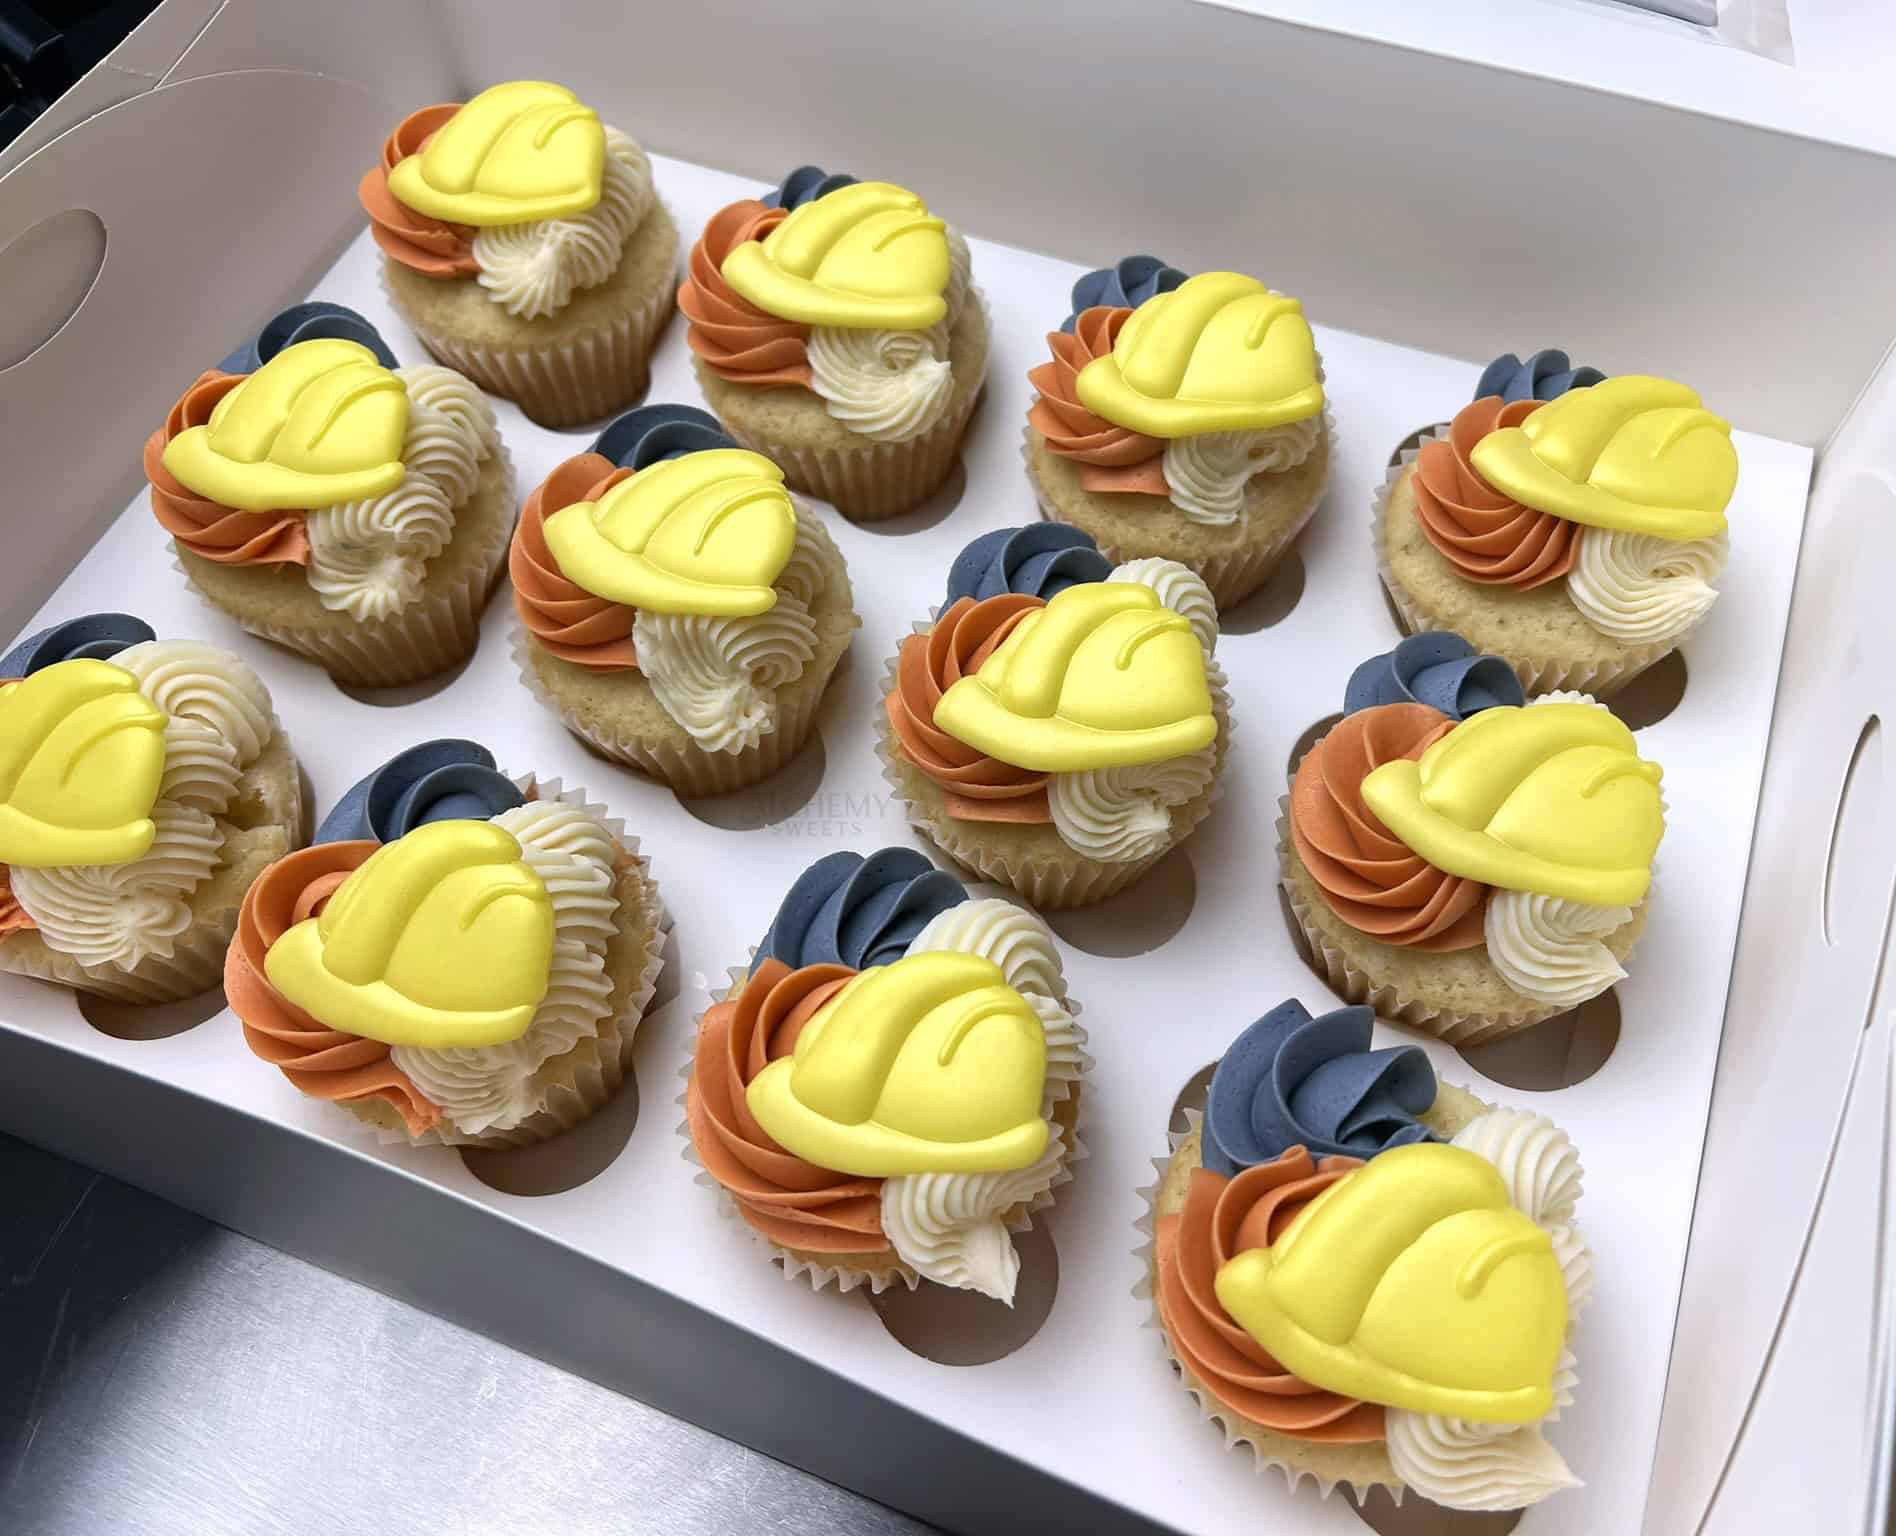
Planning a construction-themed birthday party? These construction cupcakes are the perfect addition to your dessert table! In this tutorial, I’ll show you how to create eye-catching construction-colored buttercream swirls and top them with adorable royal icing hardhat transfers.

Table of Contents
Supplies You’ll Need
For the Cupcakes:
- Your favorite cupcake recipe (baked and cooled)
- American buttercream or Swiss meringue buttercream
- Gel food coloring: Orange, Black, Navy Blue, Brown.
- Piping bags
- Piping tips: 1M, 2C, 4B or 6B
For the Royal Icing Hardhats:
- Royal icing (medium-stiff consistency – see notes below)
- Gel food coloring: Yellow and Pastel Pink/Rose (for hardhat yellow)
- Piping bags – these ones work great
- Parchment paper or acetate sheets
- Hard Hat Template – Download for FREE → here
- Gold luster dust
- Dry brush for dusting
Part 1: Construction-Colored Buttercream Swirls
Mixing Your Colors
I used three colors to create that authentic construction site vibe:
- Safety orange – Classic traffic cone/safety vest color. I used orange gel with a touch of red and brown to tone it down slightly – you want it bright and eye-catching, but not neon.
- Charcoal Grey – Gives you that concrete/asphalt look without being flat black. Start with navy blue gel and add just a tiny bit of black. Depending on your black gel, the undertones might lean purple, green, or blue – any of these work fine.
- Natural (optional clay tone) – I used my buttercream in its natural shade. If you want more of a sandy, gravel-like feel, add just a tiny touch of brown or terracotta gel color to deepen it slightly.

Tip: Gel food coloring works best for achieving these deeper shades without thinning your buttercream. Start with less than you think you need – you can always add more!
Part 2: Royal Icing Hardhat Transfers
This is what really brings the construction theme to life! While the buttercream swirls in orange, grey, and beige set the foundation, the hardhat toppers are what make these unmistakably construction-themed. Royal icing transfers let you create these detailed decorations ahead of time, so all you have to do is place them on top when you’re ready to assemble.
Preparing Your Royal Icing
The Recipe: Start with about 1 cup powdered sugar and 1-2 tablespoons of water. It’s much easier to add water to thick icing than to try fixing runny icing, so err on the side of too stiff and gradually add water until you reach the right consistency.
Consistency is KEY! Use a medium-stiff consistency (sometimes called ’15-second icing’). It should ribbon off your spatula and hold a figure 8 shape for about 15 seconds before melting back. This lets you pipe the outline and fill seamlessly without needing separate flood icing.


Coloring: Add 1/2 to 1 drop of yellow gel color, then a tiny touch of pink to desaturate it slightly and give it that realistic hardhat yellow (not neon bright).
Prep Your Piping Bag: Pour the icing into a piping bag and tie off the end. No piping tip necessary! Just snip a tiny bit off the tip of the bag when you’re ready to pipe – you want a small opening for controlled lines.


Step-by-Step: Piping Hardhat Transfers
Step 1: Prepare Your Template
- Print or trace hardhat template onto paper
- Tape parchment paper or acetate over the template
- [Any other prep tips]

Step 2: Pipe the Brim First
Using your medium-stiff royal icing and the hardhat template underneath parchment or acetate, pipe the outline of the brim and fill it in with the same consistency. Let this set for 15-30 minutes until it has a dry crust.


Step 3: Add the Sides
Pipe the side sections of the hardhat, making sure they slightly overlap the brim edge for a seamless look. Let these set for another 15-30 minutes.


Step 4: Pipe the Center Dome and Details
Outline the top portion of the hardhat, then fill the center with royal icing. Add more icing on top of that to build up a domed shape – you want dimension here, not a flat surface. The medium-stiff consistency should hold this dome without flattening out. Add any ridge lines or detail work while the icing is still wet.


Step 5: Dry Completely
Let the hardhats sit undisturbed for at least 24 hours (or until completely hard and dry to the touch). In more humid conditions, they may need 2-3 days to fully dry.
Step 6: Add Gold Luster
Once fully dried, use a soft, dry brush to dust the hardhats with gold luster dust, working in gentle strokes for even coverage.


Troubleshooting Royal Icing Transfers
Transfers are breaking: Let them dry completely – at least 24 hours, longer if your kitchen is humid. Also check that you’re piping thick enough lines; if your icing is too thin or the layers are too delicate, they’ll be fragile even when dry. Don’t apply luster dust until the transfers are completely dry – brushing on wet or partially dry icing will crack or break them.
Transfers won’t release from parchment: They’re not dry yet. Royal icing needs to be completely hard and dry before it will peel off cleanly. Be patient – rushing this step will ruin all your work.
Transfers are cracking: Make sure you’re working on a stable surface that won’t get bumped while the icing is drying. Let each layer set properly before adding the next, and avoid moving or touching the transfers until they’re completely dry (24+ hours). Applying luster dust too early is a common culprit – if the icing isn’t fully hardened, the brush pressure will cause cracks.

The hardhat dome looks flat or caved in: You didn’t add enough icing when building up the dome. Let the first layer dry completely, then pipe another layer on top to add more dimension. This is totally normal – it’s easier to add a second layer than to overload it the first time and have it spread too much.
Transfers look translucent or you can see buttercream through them: Your icing was too thin, or you didn’t add enough gel color for opacity. Royal icing needs to be opaque when dry – add more gel color (especially for lighter colors like yellow), and make sure your consistency is thick enough to build proper layers.
Part 3: Assembly (with video)
Attaching Transfers to Cupcakes
- Pipe your construction-colored buttercream swirls following the order and tips outlined above.
- Once your design is complete, gently place the gold hardhat transfer on top. You can position it wherever looks best – centered, off to one side, or nestled into the swirls. The buttercream will hold it in place.
- That’s it! The hardhat sits perfectly on the buttercream without needing any additional icing or support.

Storage Tips
Royal icing transfers can soften over time, especially in the fridge due to humidity. For best results, store your decorated cupcakes at room temperature, or add the hardhat toppers right before serving if you need to refrigerate the cupcakes. The transfers themselves can be made weeks in advance and stored in an airtight container at room temp.
Pin This Tutorial!
Save this construction cupcake tutorial to your Pinterest boards so you can find it when you’re ready to bake! Perfect for construction-themed birthday parties, builder celebrations, or any building-themed event.

Did you make these construction cupcakes? I’d love to see them! Tag me on Instagram @alchemy.sweets or leave a comment below with your photos!
Don’t forget to grab the free template! → Click here
Happy Decorating!


