*post was written under previous alias; Blossom & Cake
Sugar cookies are the perfect canvas for piped flowers, and royal icing is the go-to medium for cookie decorating because it dries firm, holds detail, and doesn’t melt at room temperature the way buttercream does. I had fun creating five different Valentine’s Day designs using a variety of piping tips. Some turned out exactly as I envisioned, others not so much, but I loved them all. Here’s what I made and how I did it!
Jump To
What You’ll Need

- Sugar Cookies
- Piping tips; an assortment of petal, leaf and drop flower tips.
- Piping bags
- Couplers; to switch out piping tips between colors
- Gel food coloring
- Royal Icing
Royal Icing Tips
I used royal icing premix from Bulk Barn (just add water according to package directions). You want stiff peak consistency, firm enough to hold its shape when piped, but not so stiff it’s hard to squeeze.
A few signs to watch for:
- Too thin: flowers flop over or petals droop
- Too stiff: icing breaks or cracks, hard to squeeze
- Just right: petals hold their shape and have a slight sheen
Adjust with water one drop at a time to thin, or a small amount of powdered sugar to stiffen. Cover your bowl with a damp towel whenever you’re not actively using it, royal icing can crust over quickly.
A note on coloring: always use gel food coloring, not liquid. Liquid adds more water and can throw off your consistency. Add color gradually with a toothpick and mix well before checking the shade. Fun fact: colors deepen slightly as the icing sits.
I used four colors for these cookies: white, soft pink, hot pink, and green. I made about 2 cups of royal icing total and divided it roughly like this: 3/4 cup white, 1/2 cup green, and split the rest between the two pinks. You can make royal icing a day or two ahead and store it in an air tight container.

Cookie Shapes & Piping Designs
I hand-cut the flower and heart shapes, and used a mason jar lid for the circles, but any cookie cutters work fine. One tool I missed having was a cookie turntable. It’s not essential, but it would have made the flower-shaped cookie designs much easier to rotate as I piped.

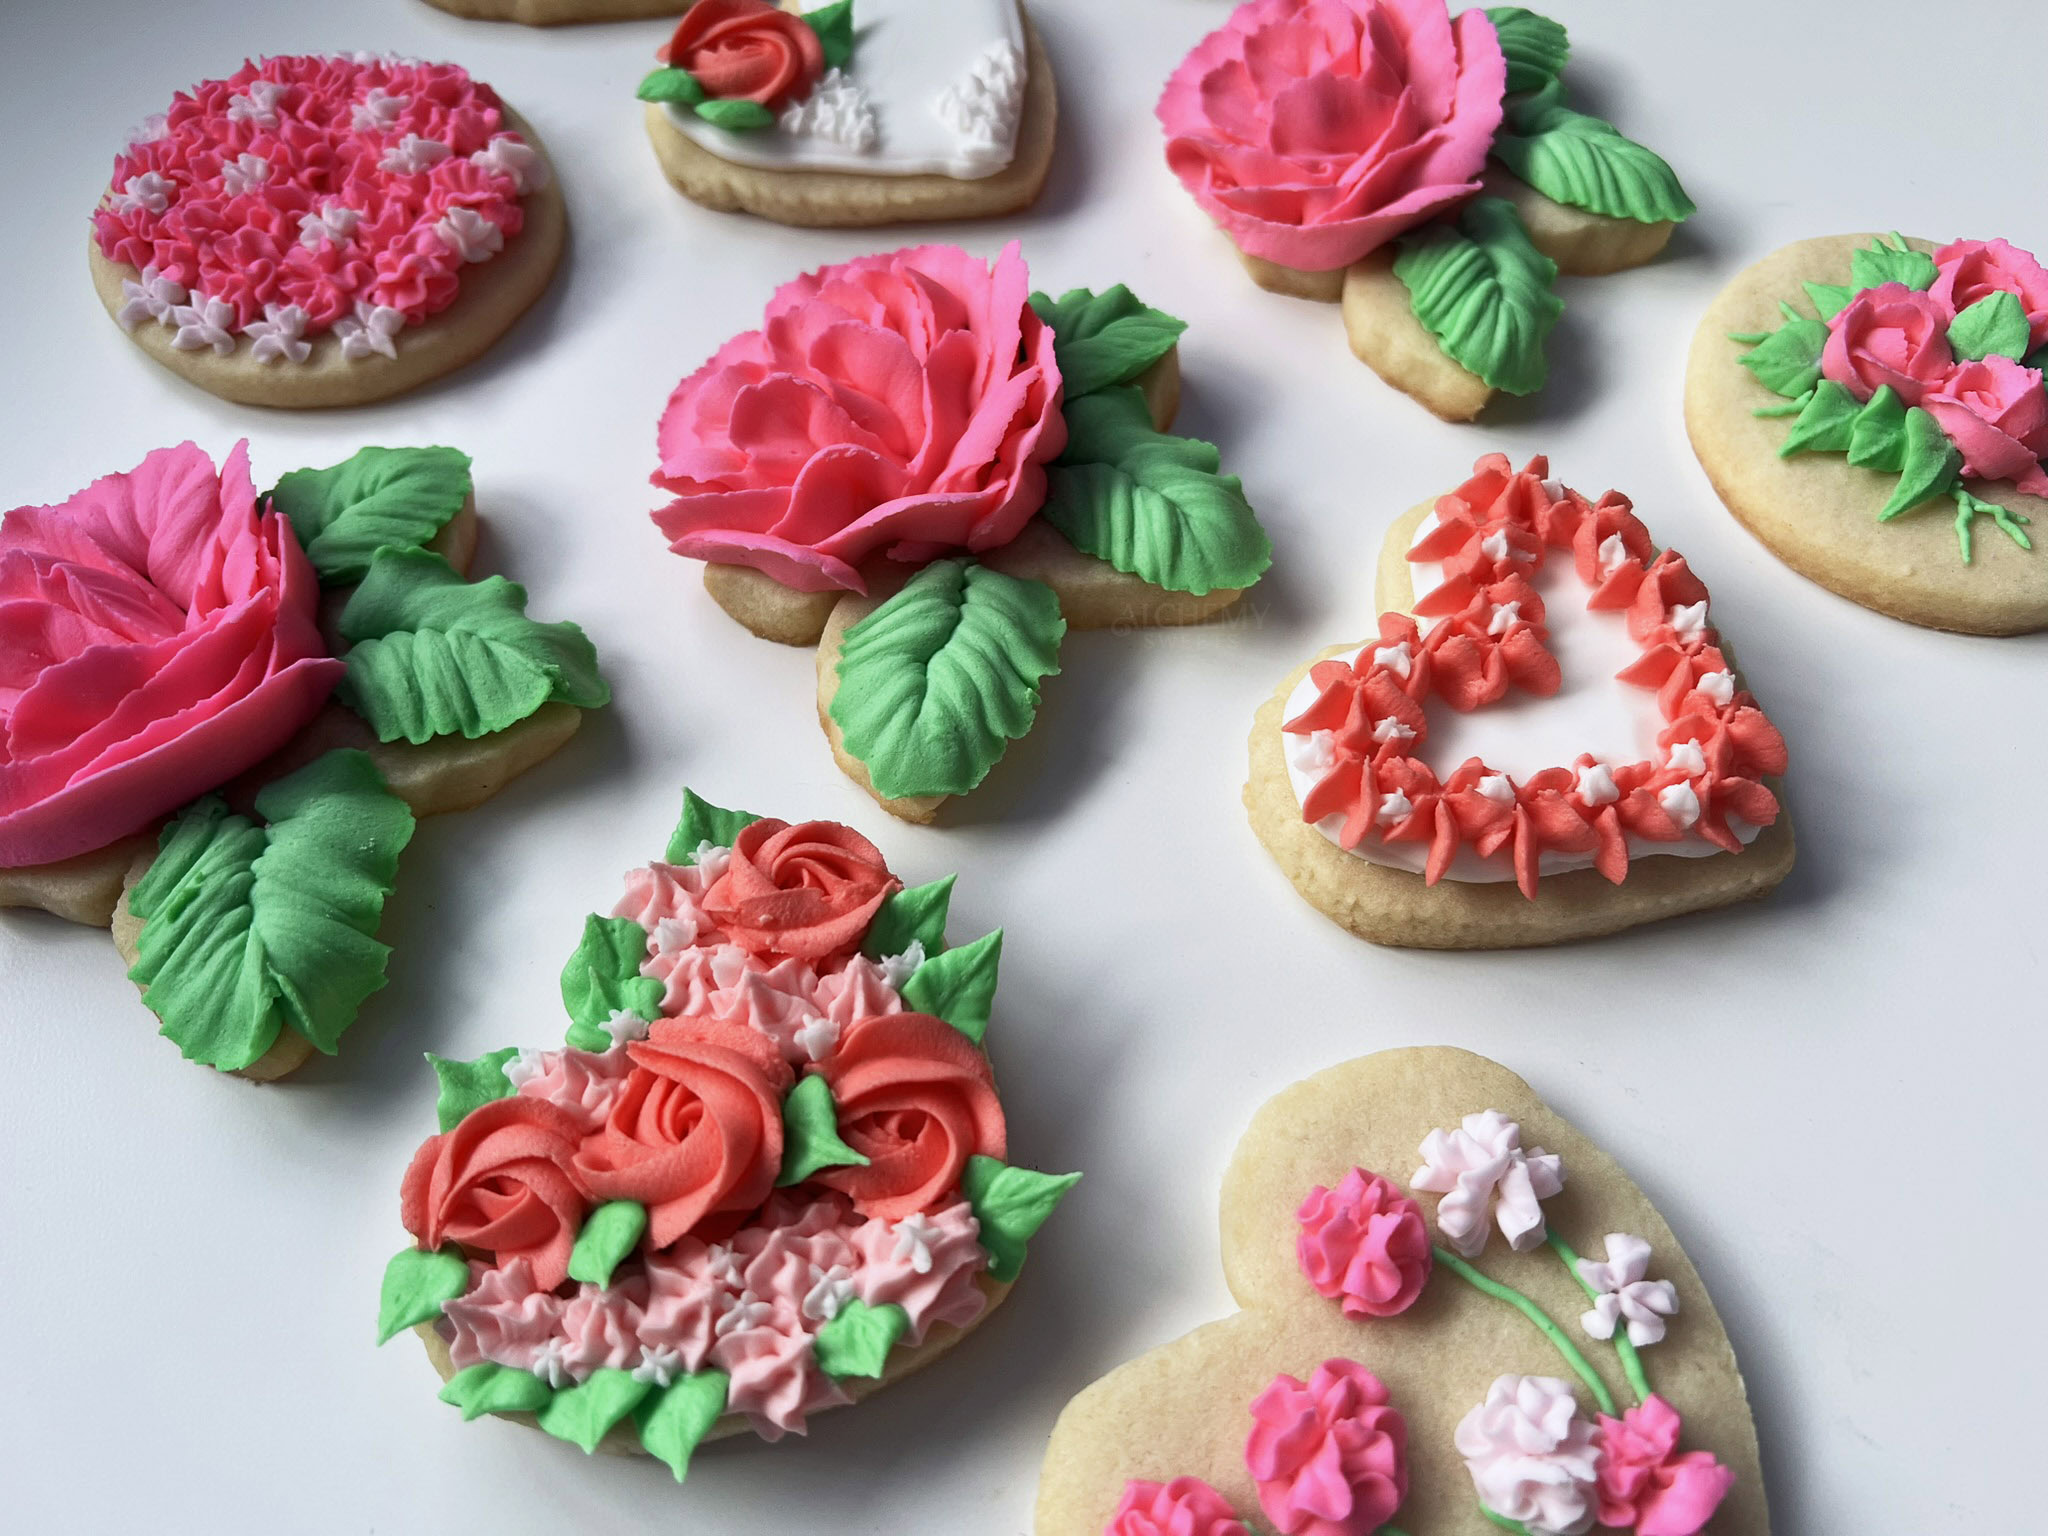
Flower-Shaped Cookies with a Flat Laying Rose
Tips used: Wilton 104 (petal)
Using a Wilton 104 petal tip, I piped a flat-laying rose bloom following the shape of the cookie. The wide end of the tip stays against the surface while you use a slight ruffling motion to build overlapping petals in layers. The leaves were piped with the same tip using short, firm pressure in a tight U shape. Start from the center of the rose and work outward so you can fill in gaps as you go. These are my favorite of the bunch.
Difficulty: Most challenging

Heart-Shaped Cookies with Rosettes & Drop Flowers
Tips used: Wilton 24 (small closed star), Wilton 13 or Ateco 17, Wilton 352 (leaf)
The goal here was a clustered, garden-style design. I piped a few rosettes first using the small closed star tip, holding the tip perpendicular (90°), applying steady pressure, and swirling outward in a spiral motion. Then I filled in the gaps with pink and white drop flowers and finished with leaves.
Difficulty: Easy

Circular Cookies Covered in Drop Flowers
Tips used: Wilton 14, Ateco 17 or 225
This one looks more intricate than it is. Drop flower tips are designed so that a single squeeze-and-twist motion creates the whole flower in one step. Hold the tip perpendicular to the cookie surface, apply pressure, give a slight twist, release pressure, and lift. Cover the entire cookie, working from either the center or the outside edge, layer colors and shapes as you desire. Two or three colors mixed in makes it look fuller. This is a great beginner project.
Difficulty: Easy

Heart-Shaped Cookies with Drop Flowers & Stems
Tips used: Ateco 225, Wilton 14, Wilton 3 (round)
I was going for a loose bouquet look with stems gathered at the base and flowers spreading outward at the top. It didn’t quite come together the way I pictured, the stems ended up a bit sparse and scattered. Next time I’d pipe the stems first, clustered more tightly at the bottom, and then place flowers at the tips before filling in around them. I would also maybe design a background for it to give it a bit more interest. That said, I don’t hate how these turned out.
Difficulty: Easy

Circular Cookie with Trio of Small Roses & Vines
Tips used: Wilton 102 (small petal), Wilton 352 (leaf), Wilton 3 (round tip for vines)
These small roses were piped directly on the cookie rather than on a flower nail first, which made them trickier, you can’t rotate the surface easily or get the best angle. If you want cleaner roses, pipe them on a small square of parchment paper, let them crust over for 15-20 minutes, then transfer carefully with an offset spatula. Or, if you have a small turntable designed for cookies, this design would benefit from that too.
I piped the vines first as a loose guide for placement, then added the roses and filled in with leaves.
The piping techniques are the same ones I use for buttercream flowers, if you want a closer look at how to pipe roses and leaves, this post walks through it step by step.
Difficulty: Moderate

Difficulty Guide
- Easy: Circular cookies covered in drop flowers, heart with rosettes & drop flowers
- Moderate: Heart with drop flowers & stems, circular cookie with roses
- Most challenging: Flower-shaped cookies with flat laying rose
Troubleshooting Common Issues
Icing too stiff? Add water one drop at a time until it pipes smoothly but holds its shape.
Petals drooping or bleeding? Icing is too thin, add powdered sugar gradually and test again.
Flowers looking flat? Overlap petals slightly and vary your pressure. Build in layers rather than trying to get dimension in a single pass.
Flowers not sticking to the cookie? Make sure the cookie surface is clean and not oily. Brush very thin layer of icing as a base, this can help flowers adhere.
Icing crusting in the bag? This happens fast. Keep a damp paper towel over the tip opening between uses, and don’t mix more than you can use in a couple of hours.
Colors bleeding into each other? Let each section crust for a few minutes before piping adjacent colors right next to it.
FAQ
Can I use buttercream instead of royal icing on cookies? You can, but buttercream doesn’t dry firm, so keep in mind that cookies decorated with buttercream can’t be stacked or packaged without smudging.
How far ahead can I decorate these? Royal icing dries fully in 6-8 hours at room temperature. You can decorate cookies 2-3 days ahead and store them uncovered (or loosely covered) at room temperature.
How do I store decorated cookies? Once fully dry, store in a single layer (or stacked) in an airtight container at room temperature for up to a week. Don’t refrigerate, condensation can make the icing sticky or cause colors to bleed.
Can I freeze them? Yes. Freeze undecorated cookies and decorate after thawing. Freezing decorated cookies can introduce unwanted moisture to the icing and cause damage to your designs.
Do I need a stand mixer? Not for royal icing from premix, a hand mixer works fine. If you’re making royal icing from scratch with meringue powder, a stand mixer makes it easier to get stiff peaks.
More Valentine’s Day Designs
If you enjoyed this tutorial, don’t miss these other Valentine’s ideas:
- Buttercream Roses on Cupcakes
- Mini Bouquets on Cakesicles
- Candy Melt Heart Cupcakes with Mini Flowers
- Heart-Shaped Cupcake Bouquet
Final Thoughts
Royal icing consistency is everything with cookie decorating , get that right and the rest is just piping practice. Start with drop flowers if you’re new to piping, and work up to roses once you’re comfortable with pressure control. Practice on parchment paper before touching the cookie. And if something doesn’t turn out exactly as planned, pipe a few extra flowers on top and call it intentional.
Tag me @alchemy.sweets on Instagram with your floral cookie designs or leave a comment below with your experience. Sign up for my newsletter to receive monthly decorating inspo and more!
Happy decorating!