*post was written under previous alias; Blossom & Cake
Learn how to create festive candy cane cakesicles with classic peppermint stripes and crushed candy cane topping! These are perfect for holiday parties, gift boxes, or as a fun baking project with kids. The candy cane design is surprisingly easy—just alternating drizzle lines that mimic the iconic red and white stripes.
What I love about these is how the crushed candy canes add both texture and flavor. You get that satisfying peppermint crunch with every bite, and they look absolutely adorable displayed together. In this tutorial, I’ll show you two decorating styles: full candy cane stripes and a corner drizzle design.
Table of Contents
Supplies
- Cake
- Cakesicle mold
- Candy melts
- Food dye
- Popsicle sticks
- Microwave safe/heat safe container
- Wax or parchment paper
- Piping Bags
- Candy canes
- Sprinkles

Step-by-step Cakesicle
Making & Dipping the Cakesicles
For this design, I’m using my standard cakesicle technique. If you’re new to cakesicles or need a refresher, check out my complete step-by-step cakesicle tutorial here
Quick summary: Mix crumbled cake until it forms a ball, press into molds, insert sticks, chill, unmold, dip in melted candy melts, and let set before decorating.
Once your cakesicles are dipped and set, you’re ready for the candy cane magic!

Step-by-step Candy Cane Cakesicle Decorating
Prepare Your Crushed Candy Canes:
Before you start decorating, crush your candy canes into small pieces. Place unwrapped candy canes in a sealed plastic bag and use a rolling pin or the bottom of a heavy mug to crush them. You want a mix of fine dust and small chunks for the best texture and visual appeal.
Decorating Tips: If your candy melts are warm, they should flow easily from the piping bag. If they begin to set, the flow will be uneven, and you’ll need to apply pressure. To achieve smooth lines, keep the candy melts warm. I recommend having a bowl of warm water nearby to dip the bag in, but dry it off with a towel before decorating. Make sure the tip of the bag does not touch the water, as water and candy melts do not play nice together. Add crushed candy canes while candy melt drizzles are still wet so they stick properly.
Design Idea 1
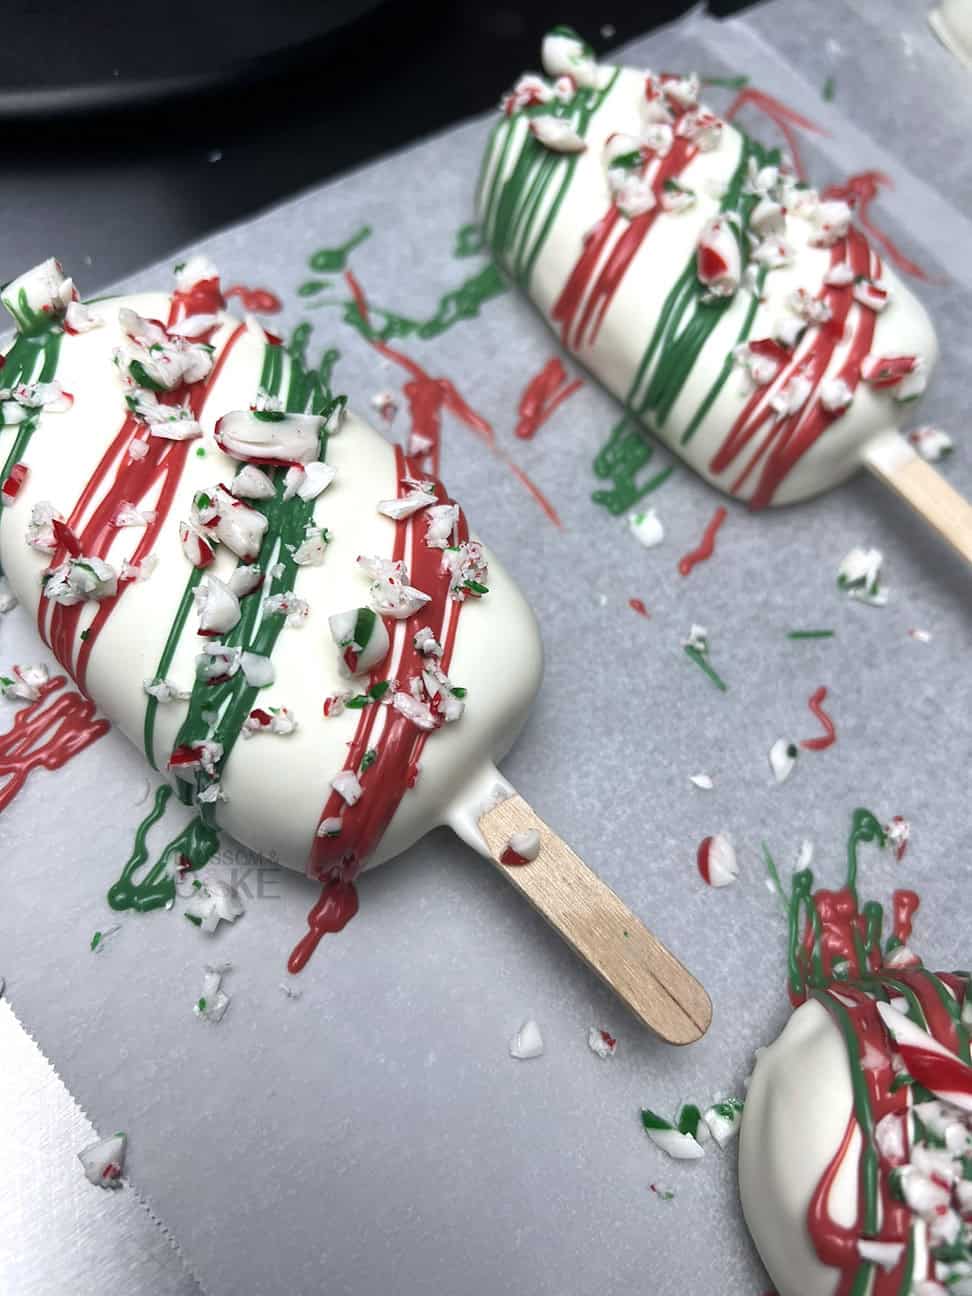
Start with a white-dipped cakesicle that’s fully set and at room temperature.
Using a piping bag filled with red candy melts, pipe a diagonal stripe from the top left corner down to the bottom right. Leave a generous gap of white showing after this stripe.
Pipe another red stripe parallel to the first, again leaving a gap of white.
Continue this pattern across the entire cakesicle, creating evenly-spaced diagonal red stripes.
Now, using green candy melts, pipe stripes in the gaps between the red stripes. Make sure to leave white space on both sides of the green—you want to see: red stripe, white gap, green stripe, white gap, red stripe, and so on.
This creates that classic tri-color candy cane effect with red, white, and green sections.
While the stripes are still wet, generously sprinkle crushed candy canes over the entire surface. Gently press them in with your fingertips so they adhere well.
Let set for 15-20 minutes before handling.
Tips for this design:
- You can make your sections as thick or as thin as you like
- Keep your stripes evenly spaced for the cleanest look
- Pipe at a consistent angle so all stripes run parallel
- Don’t worry if the edges aren’t perfect—the crushed candy canes hide imperfections!


Design Idea 2
Start with a white-dipped cakesicle that’s fully set and at room temperature.
Using red candy melts in a piping bag, drizzle back and forth across the top quarter of the cakesicle, creating horizontal lines.
Switch to green candy melts and drizzle over the same area, overlapping the red slightly to create a layered, festive effect.
While both colors are still wet, sprinkle crushed candy canes generously over the drizzled area.
Let set for 15-20 minutes before handling.
Tips for this design:
- The overlapping red and green creates beautiful color depth
- Keep the drizzle concentrated in one corner for a modern, asymmetrical look
- Less is more—don’t cover the entire cakesicle, let the white base shine through


Troubleshooting:
Candy cane pieces falling off? You waited too long to add them—the candy melts need to be tacky, not fully set.
Stripes looking wobbly? Practice your piping motion on parchment paper first, or use a ruler as a guide for straight lines.
Crushed candy canes dissolving or getting sticky? Moisture is the enemy. Make sure your cakesicles are completely dry before decorating, and store in an airtight container.
Red and green colors bleeding together? Let the red set for 2-3 minutes before adding green on top.
Storage:
Store candy cane cakesicles in an airtight container at room temperature for up to 3 days. The crushed candy canes can get sticky in humid environments, so if your kitchen is warm or humid, store them in the fridge and let come to room temperature before serving.
These make adorable gifts wrapped in clear cellophane with a candy cane tucked into the bow!