*post was written under previous alias; Blossom & Cake
Learn how to decorate classic red and green festive cakesicles with this step-by-step tutorial. Cakesicles (cake pops shaped like popsicles) are one of my favorite treats to make for the holidays. They’re adorable, portable, and endlessly customizable with different colors, sprinkles, and decorations.
What I love about cakesicles is that they’re actually easier than traditional cake pops. The flat popsicle shape gives you a stable canvas to work with.
In this tutorial, I’m keeping it festive with classic red and green colors, but you can adapt this technique for any holiday or theme—think pastels for Easter, orange and black for Halloween, or blue and silver for winter wonderlands. The decorating possibilities are endless once you master the basic technique.
I’ll walk you through making the cakesicle mixture, molding and chilling, dipping in chocolate, and adding those final decorative touches that make them look bakery-perfect.
Jump To
Supplies
- Cake
- Cakesicle mold
- Candy melts
- Oil-based food dye
- Popsicle sticks
- Microwave safe/heat safe container
- Wax or parchment paper
- Piping Bags
- Sprinkles
Step-by-step Festive Cakesicles
Making cakesicle dough
- Make a cake of your preferred flavor. (I found 1 box cake makes 7 cakesicles)
- Allow the cake to rest in the pan for five minutes following its removal from the oven.
- Transfer the cake into a mixing bowl.
- With a stand mixer or a handheld mixer set to a medium-low to medium speed to beat the cake. The texture of the cake will become crumbly; however, the steam generated from the heat will assist in combining the crumbs to form a ball. This can take up to 10 minutes, trust the process!
- If a ball does not form after a few minutes, incorporate one tablespoon of buttercream at a time until the mixture forms ball.
- Allow the mixture to cool before handling.
Shaping a cakesicle
I used these cakesicle molds from Amazon, however I have also seen them at my local Bulk Barn.
- Take some of the cake mixture and press into the mold to fill.
- Use a cake scraper or palette knife to even out the top.
- Melt your candy melts.
- Dip the end of a popsicle stick in the candy melts, then insert into the cakesicle in the designated area.
- Chill cakesicles in the fridge or freezer for 30 minutes.
- Remove cakesicles from mold carefully by pushing underneath and peeling the silicone mold away.
- Push the the popsicle stick up and slide out.


Melting candy melts
- Place candy melts in a microwave-safe bowl or container.
- Heat in the microwave for 30 seconds, then stir the contents.
- Continue to microwave for an additional 30 seconds and stir again.
- Microwave in 10-second intervals, stirring between each interval.
- Avoid overheating the candy melts;
- Once they are nearly completely melted, utilize the residual heat from the container to aid in melting the remaining pieces. Keep stirring until melted fully.
- Prepare a pot or bowl of hot water to sit the container in, this will help keep the container warm but not be continuously heating it up.
Dipping a cakesicle
- Place a sheet of wax or parchment paper on a flat and level surface.
- Arrange the cakesicles in a single layer.
- In a container deep to fully submerge the cakesicle, immerse it in the candy melts until reaching the popsicle stick.
- If the cakesicle can’t be full submerged, tilt the container toward yourself to help bring the candy melts up to the stick.
- Pull the cakesicle vertically and allow any excess candy melt to drip off.
- Angle the cakesicle slightly to encourage runoff from the underside.
- Do a wiggling motion or a light tap of your hand to assist in removing the excess coating.
- Carefully run the bottom of the cakesicle along the rim of the container to remove any remaining excess.
- Lay the dipped cakesicle flat on the wax or parchment paper and allow it to set for 30 minutes.
- If cakesicle is too cold, the candy melts will set too quickly and crack


Once you are done dipping your cakesicle, pour some of the remaining candy melts from the container into a piping bag. I found these ones from Amazon would really well. Tie off the end. Cut the very tip of the piping bag.
Decorating tips: If your candy melts are warm, they should flow easily from the piping bag. If they begin to set, the flow will be uneven, and you’ll need to apply pressure. To achieve smooth lines, keep the candy melts warm. I recommend having a bowl of warm water nearby to dip the bag in, but dry it off with a towel before decorating. Make sure the tip of the bag does not touch the water as water and candy melts do not play nice together. Add sprinkles while candy melts drizzles are still wet.

Step-by-step Festive Cakesicle Decorating
Now comes the fun part—decorating! The beauty of these simple drizzle designs is that they look elegant and professional but are incredibly beginner-friendly. You don’t need fancy piping skills or expensive tools, just a steady hand and a piping bag of melted candy melts.
Color Combinations to Try:
While I’m using classic red and green for the holidays, don’t limit yourself! Here are some other festive combinations:
- Winter Wonderland: White cakesicles with silver and blue drizzles
- Elegant Gold: Ivory base with gold and champagne drizzles
- Peppermint: White base with red and pink stripes
- Modern Christmas: Deep burgundy with rose gold accents
- Snowy Forest: Green base with white drizzles to mimic snow
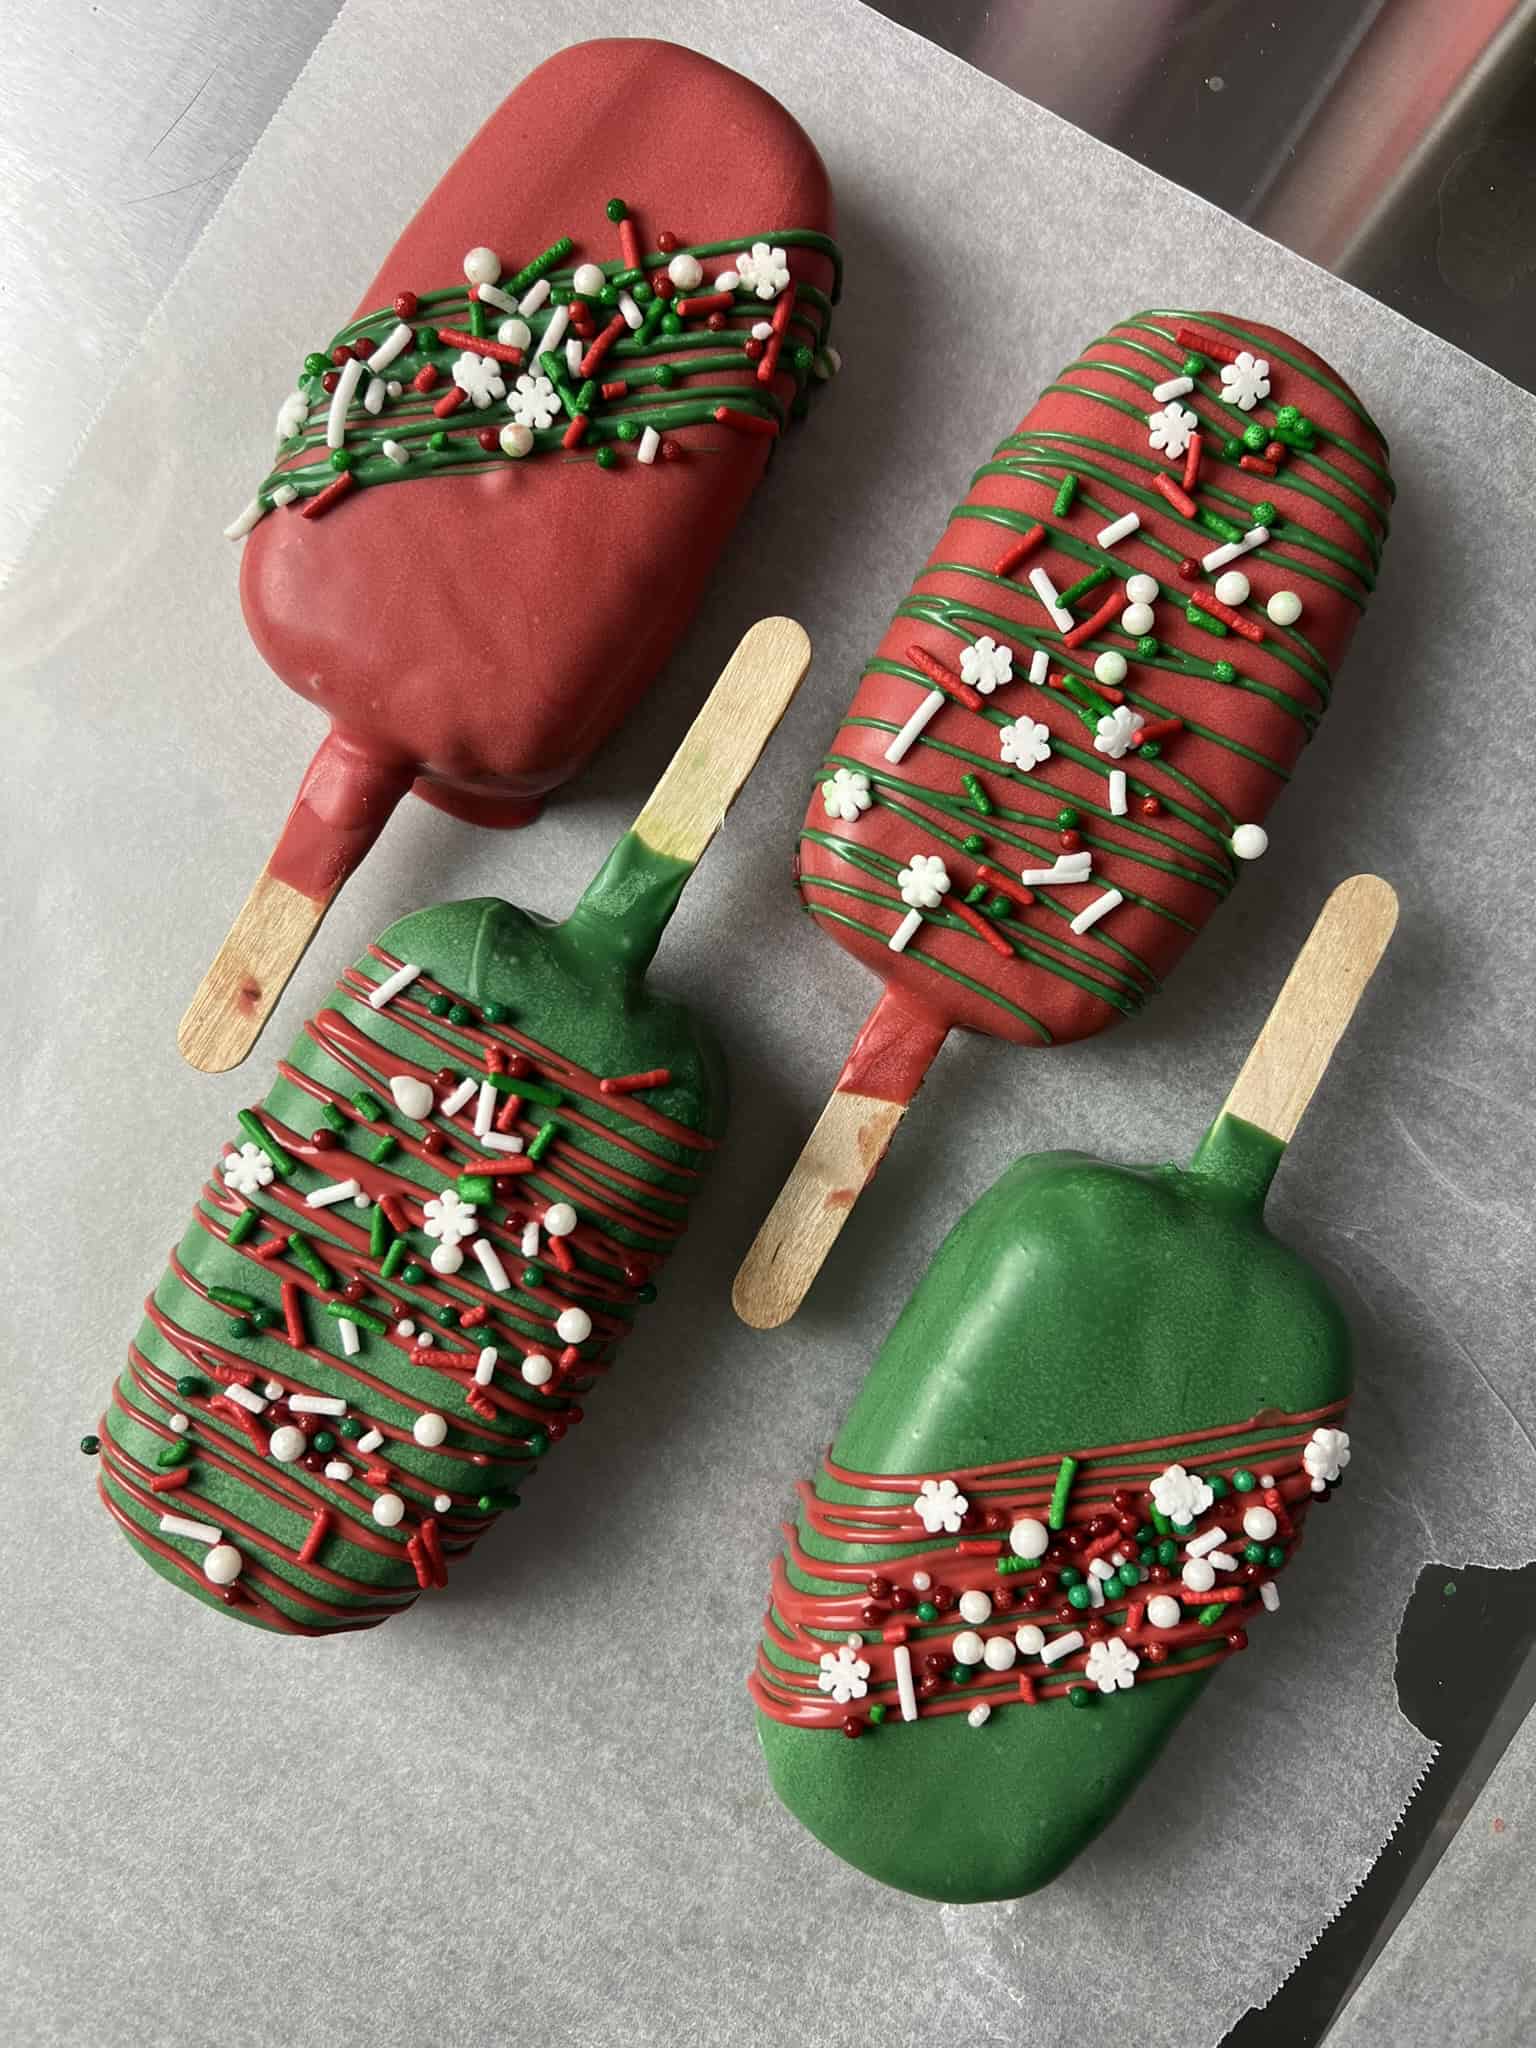
Design idea 1
Drizzle candy melts from a piping bag from top to bottom, then back to the top, repeating as desired. (In the example below, I did two layers.) This creates a clean, modern look with elegant vertical lines.
Tip: Keep your hand steady and move at a consistent speed for even drizzle lines. If the candy melts are flowing too fast, let them cool slightly before piping.


Design idea 2
Drizzle candy melts from a piping bag diagonally from bottom left to top right of the cakesicle. Create as many lines and layers as you want while moving up and down. (In the example below, I did about four layers.) The crisscross pattern adds movement and visual interest.
Tip: Alternate directions for each layer (bottom-left to top-right, then top-left to bottom-right) to create a more complex lattice effect.


Troubleshooting:
Candy melts too thick to drizzle smoothly? Reheat in 5-second intervals or add 1 teaspoon of coconut oil or shortening to thin the consistency. Ensure water is not an ingredient when adding!
Drizzles breaking or looking chunky? Your candy melts cooled too much. Warm them up again until they flow smoothly from the piping bag.
Sprinkles falling off after they dry? You waited too long to add them. The candy melts need to be tacky, not fully set.
Colors bleeding into each other? Let the first color set for 2-3 minutes before adding the second color on top.
Storage & Serving:
Store decorated cakesicles in an airtight container at room temperature for up to 3 days, or refrigerate for up to 1 week. If refrigerating, let them come to room temperature for 10-15 minutes before serving for the best texture. You can also freeze them for up to 1 month—just wrap individually in plastic wrap first.
These cakesicles look beautiful displayed upright in a foam block or styrofoam, arranged on a platter, or individually wrapped in cellophane bags tied with ribbon for gifting.

Happy decorating!