*post was written under previous alias; Blossom & Cake
Two-toned buttercream flowers are a beautiful way to add dimension and detail to your cake and cupcake designs. The best part? The technique is simpler than it looks! In this guide, I’ll walk you through how to two-tone your piping bag, along with tips for achieving different effects, such as dual-toned rosettes, hydrangeas, and tulips (using Russian tips). You can even try a 3-tone technique for a fun twist!
Whether you’re decorating cupcakes, cakes, or cookies, this beginner-friendly guide has everything you need to get started, including step-by-step instructions and a video tutorial.
What is Two-Toning, and Why Should You Try It?
Two-toning adds depth and visual interest to your floral designs, making them pop! This versatile technique can be applied to various projects, and today, I’ll show you how to create three different flowers using dual-toned buttercream.
For a step-by-step guide to piping some of the buttercream flowers in this post, be sure to check out my Learn to pipe Buttercream Flowers blog post and Learn to pipe Buttercream Flowers video on Youtube.
JUMP TO:
What You’ll Need
- Piping Surface:
- Cupcake, cake, parchment paper, or a flower nail (depending on your project).
- Buttercream:
- At least two colors for the two-toned effect.
- Piping Tips:
- Rose: Wilton 104
- Tulip: Russian tip
- Rosette: Wilton 2D or 1M
- Hydrangea: Wilton 2D
- Peony: Wilton 123
- Piping Bags
- Small Spatula or Butter Knife and spoon:
- To apply and position the colors inside the piping bag.
- Food Coloring
- Optional Tools:
- Flower lifter or small offset spatula to transfer flowers piped on parchment or a flower nail.
- Couplers; for easily switching tips with the same piping bag.
How to Prepare a Two Tone Piping Bag
- Prepare the piping bag:
- Fit the piping bag with your chosen piping tip (e.g., Wilton 2D or 104).
- Add the outer color:
- Take a butter knife and spread the first buttercream color (outer color) along the inside of the piping bag.
- Start as close to the piping tip as possible and work your way up, covering about halfway up the bag.
- Add the inner color:
- Use a spoon to scoop the second buttercream color (inner color).
- Carefully place the inner color into the piping bag, aiming to keep it in the center and as low as possible.
- Use your thumb to scrape the buttercream off the spoon while inserting it into the bag.
- Close and position buttercream:
- Once both colors are in the bag, twist the top of the piping bag closed.
- Squeeze the buttercream down toward the tip until both colors appear evenly.
Tips:
- Use complementary or contrasting colors for a striking two-toned effect.
- Ensure both buttercream colors are of similar consistency for smooth piping.
- Practice squeezing a small amount onto parchment paper to ensure the two colors flow correctly before decorating your cupcakes.
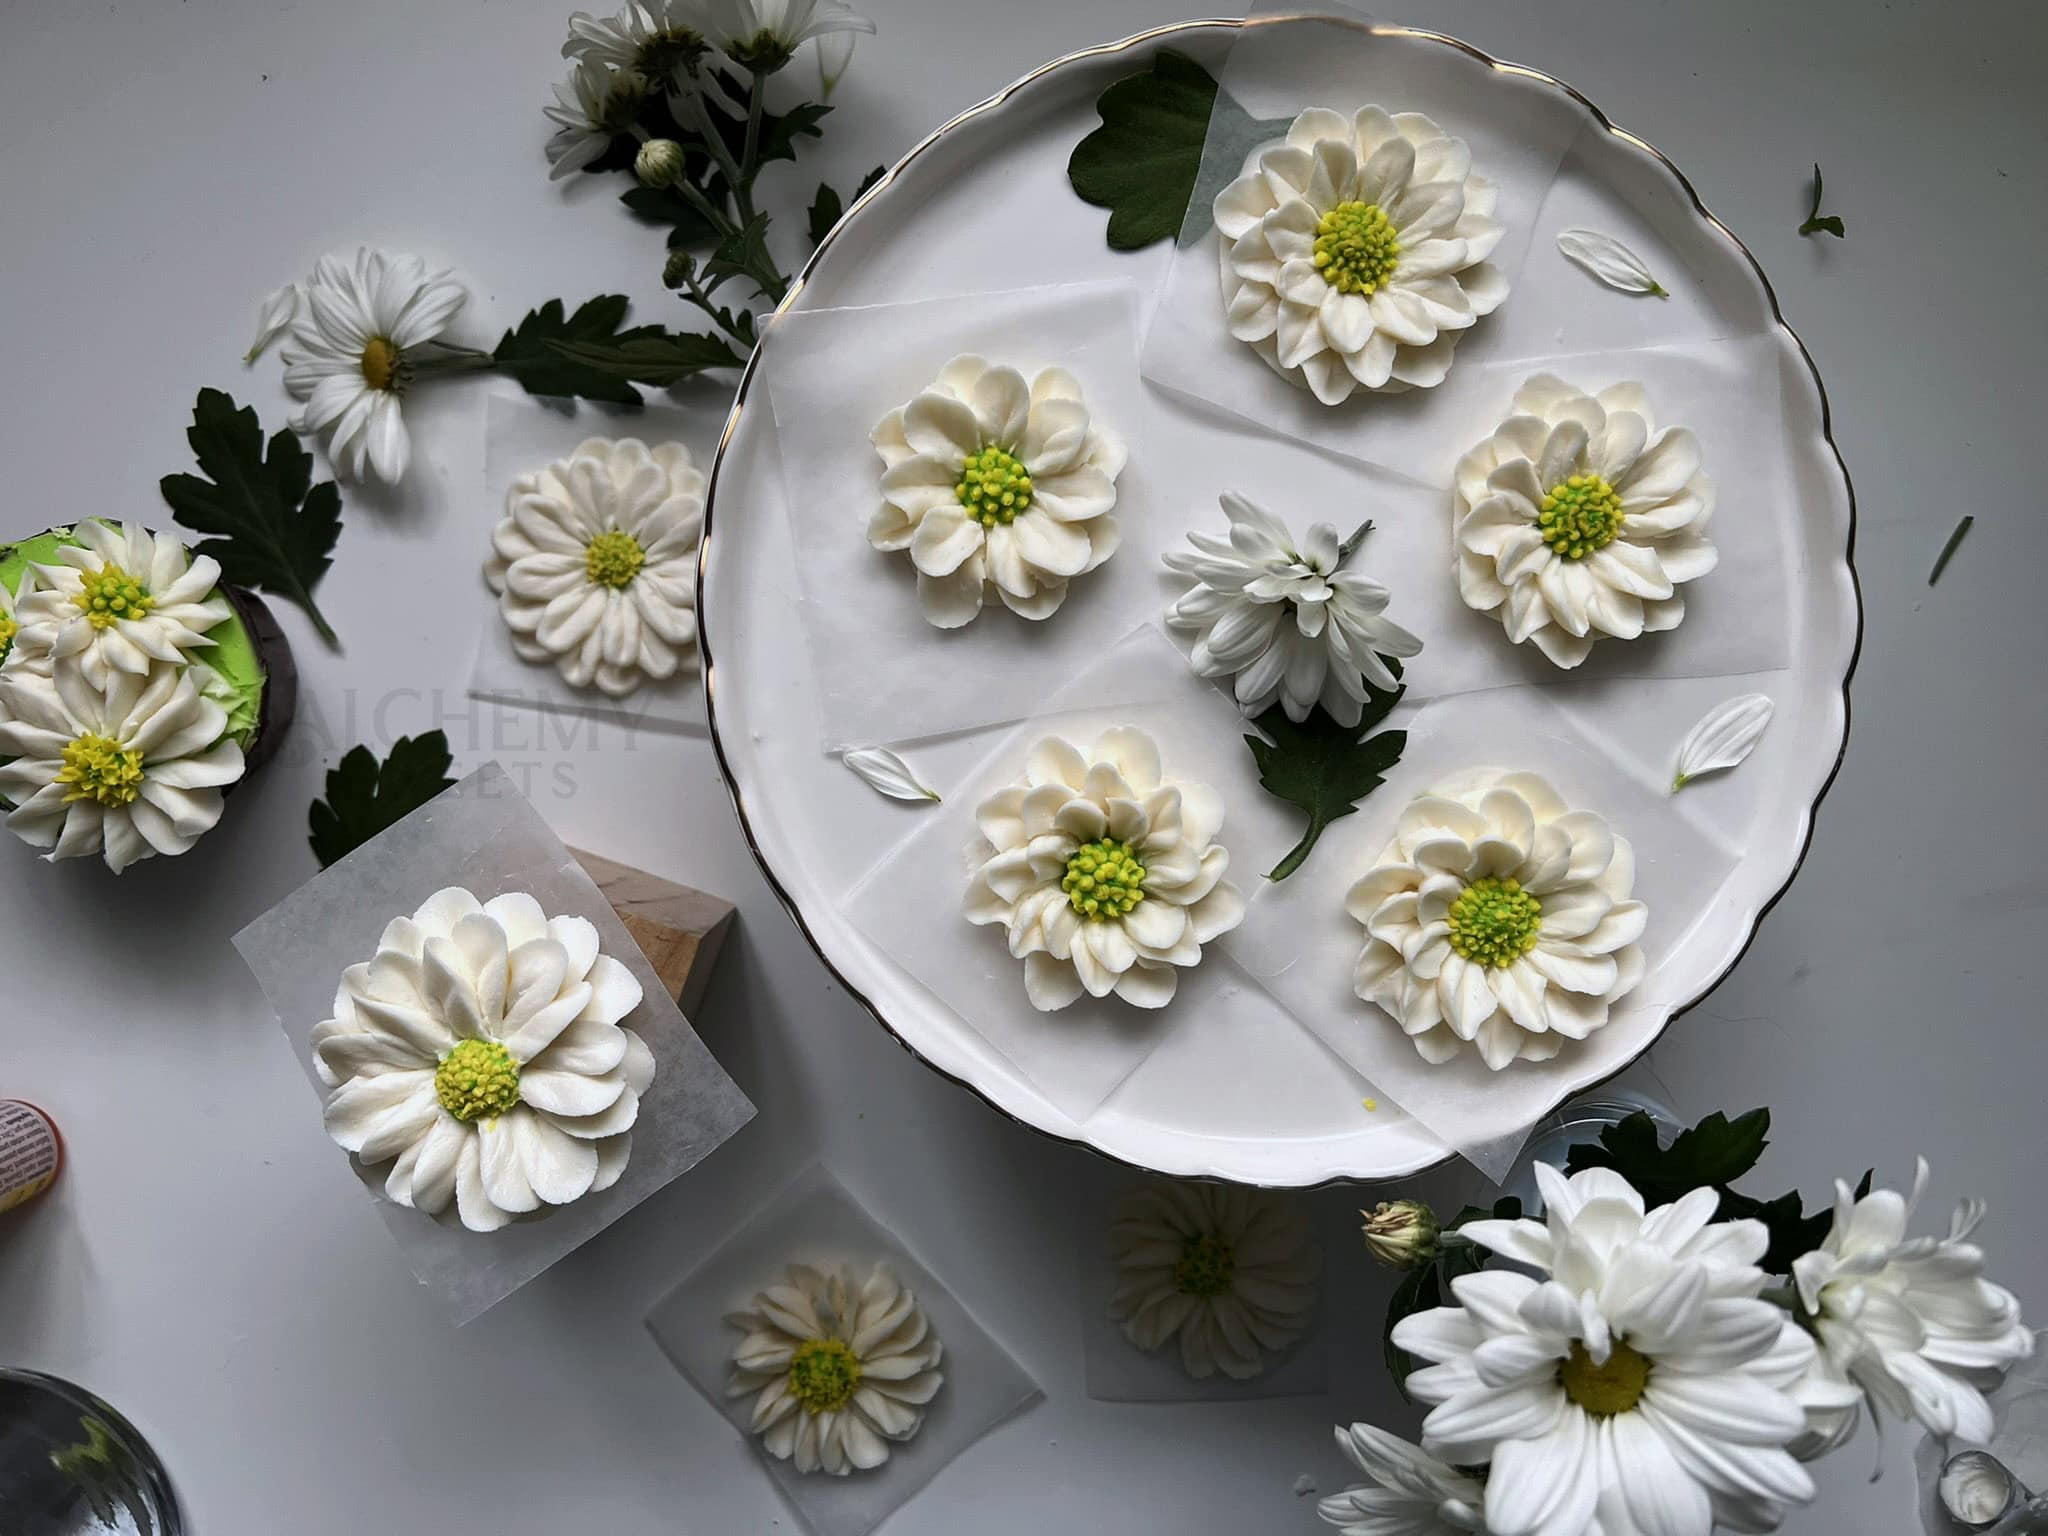
Flower Designs
With the two-toned piping bag technique outlined above, you can create stunning buttercream flowers that showcase beautiful color gradients and realistic petal details. In this section, we’ll explore three flower designs: the classic rosette, the delicate hydrangea, and the elegant tulip using Russian tips. Each design highlights the versatility of this technique, allowing you to bring your cupcakes and cakes to life with vibrant, professional-looking floral decorations.
Rosette
A rosette with a two-toned effect adds a soft yet striking contrast to your design. By applying a second color to one section of your piping bag, you can create a beautiful blend along the petals. This technique gives the rosette a dynamic appearance, where the outer edge of the flower is highlighted with a different color, making it pop while still maintaining a smooth, elegant look. Below is an example of a two-toned rosette with subtle color variations, perfect for any occasion.


When creating dual-toned rosettes, it’s important to ensure the two colors blend smoothly without mixing too much. If you’re using a piping bag with two different colors, make sure to fill the bag evenly and keep the pressure consistent as you pipe. If the colors start to blend too much or appear uneven, try adjusting the amount of buttercream in each section of the piping bag or experiment with different piping tips that create more distinct lines between the colors.

Troubleshooting Tip: If the two-tone effect on your rosettes isn’t showing clearly, check that the colors are positioned properly in the piping bag—one color along the inside and the other filling the rest. Pipe a small amount first to ensure the colors flow evenly, and adjust your pressure for a consistent swirl.
Hydrangea
The hydrangea is another stunning flower that benefits from a two-toned effect. By filling your piping bag with two different colors, you can create a natural gradient along the petals. The result is a soft, multi-colored bloom where the outer edges of each petal are slightly darker, creating dimension and depth. I love piping hydrangeas on cupcakes—the delicate, layered look is perfect for any floral-themed designs.
For an easy step-by-step guide on piping hydrangeas, check out my Learn to pipe Buttercream Flowers blog post.
Suggested Color Combos:
- Soft pink and light blue
- Lavender and white
- Green and blue
- Red/Orange and yellow to emulate a firework.


Troubleshooting Tip: To achieve the best results with your hydrangea, make sure the buttercream is thick enough to hold its shape but not so stiff that it won’t pipe smoothly. A 1M or 2D tip works well for creating the rounded, textured petals.
Tulip
The buttercream tulip, piped using a Russian piping tip, is an elegant and versatile design that adds vibrant color to cakes, cupcakes, and cupcake bouquets. This tip allows you to create full, beautiful flowers with just one squeeze, making it quick and beginner-friendly.

For a striking variation, try a two-toned tulip. By adding two colors to your piping bag, you can create a gradient effect where the petals transition seamlessly from one color to another. The second color highlights the petal edges, giving the flower depth and a beautiful finish. This technique adds an extra layer of sophistication to your tulip designs and brings a fresh, colorful touch to any dessert.


Troubleshooting Tip: When piping tulips with a Russian tip, make sure your buttercream has the right consistency—not too soft, or the petals will collapse. A slightly firmer buttercream will ensure your tulips hold their shape beautifully. On the same note, you don’t want it too firm either, otherwise the buttercream will not release from the tip properly.

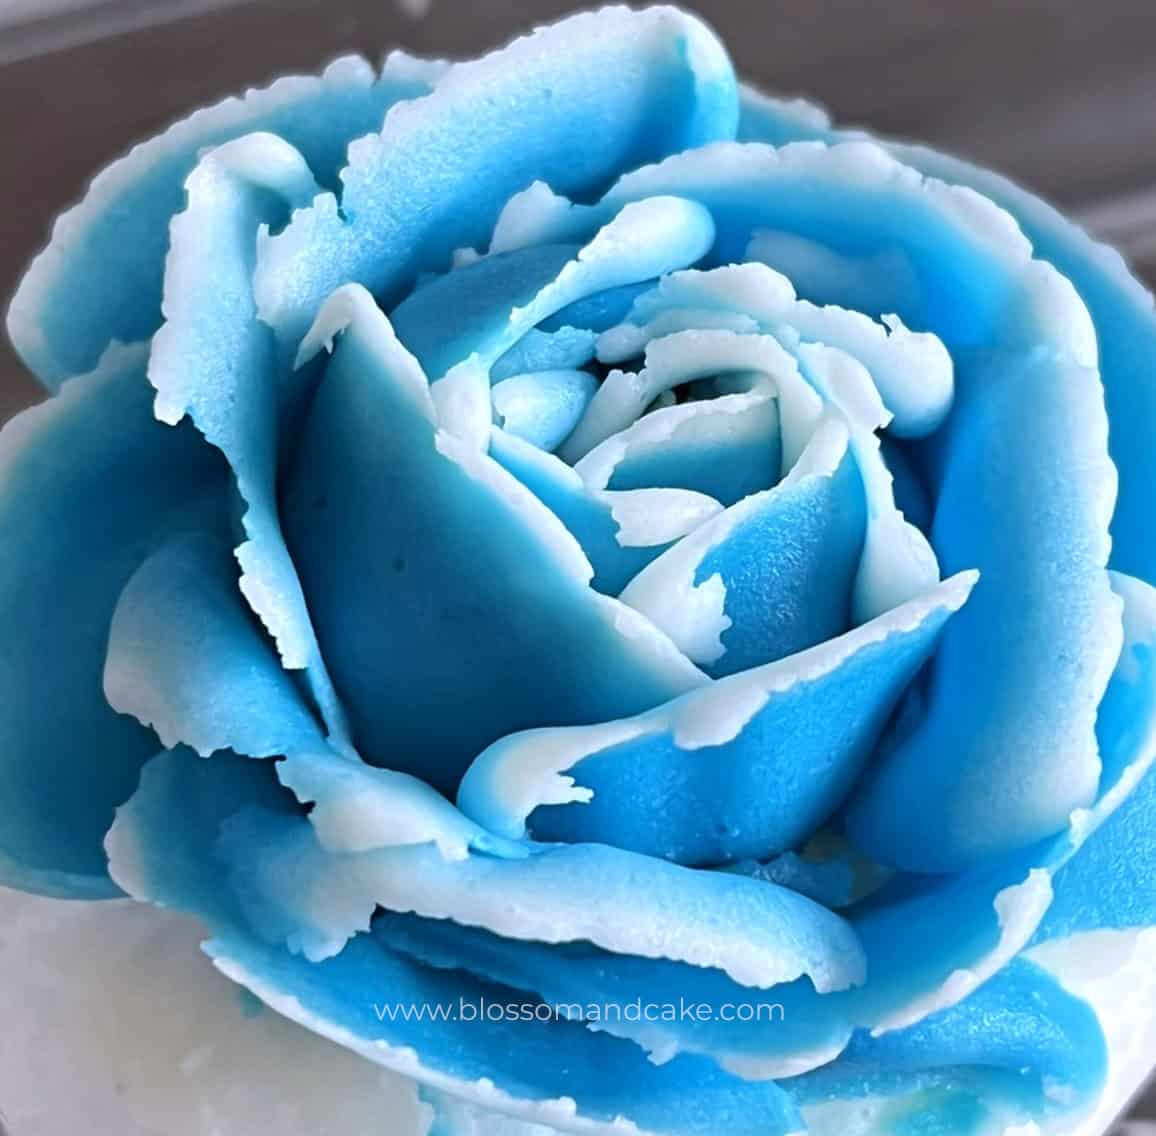
Two-Toned Rose with Colored Edges
Another beautiful way to create a two-toned effect is by adding a second color only to the edge of the petals, leaving the rest of the rose in a clean, white buttercream. This technique involves applying the second color to just one crease of your piping bag, allowing you to pipe a subtle, yet striking, contrast along the petal edges.
Below is an example of a rose with this two-toned effect, where the outer edges of the petals are colored, creating a soft gradient from the center to the edges.
To learn how to pipe a rose, check out my real-time buttercream flower piping video on Youtube.


Troubleshooting Tip: If the edge color on your two-tone rose isn’t showing clearly, make sure the colored buttercream is applied precisely to the seam of the piping bag where it will form the petal edges (the narrow edge of the petal tip.) Use firm buttercream and practice steady pressure while piping to maintain crisp, clean lines.
Switching Buttercream Colors for a Two-Toned Peony
To make the peony extra special, I used two buttercream colors: pink and natural. Here’s a little trick I love for swapping colors without needing a new piping bag.
First, I wrapped each color separately in plastic wrap. This makes it super easy to switch them out of the piping bag fitted with a Wilton #123 tip. I started with the pink buttercream to pipe the center petals of the peony. Once the center was done, I swapped the pink for the natural-colored buttercream and finished piping the outer petals.
This method keeps the colors clean and makes it easy to switch them out, so your peony looks beautifully layered. With the two colors I used—pink for the center and natural for the outer petals—the transition is more defined for a bold contrast. However, you can use as many colors as you want to create a softer, more seamless gradient between the petals. It’s totally up to you and the look you’re going for!

Troubleshooting Tip: When switching colors while using plastic wrap for a two-tone peony, pipe out a small amount of buttercream after inserting the new color wrap. This ensures any mixed color is cleared, allowing the fresh colors to come through cleanly and distinctly.
General Tips for Success
Creating beautifully two-toned buttercream flowers takes practice, but a few key techniques can make a big difference in your results. Below are some general tips to help you achieve clean, vibrant designs with ease.
Two-Toning Piping Bags
- Choose Complementary Colors:
- Select colors that blend well together to create a seamless gradient. For a bold contrast, opt for colors on opposite ends of the color wheel, or for a soft look, stick to shades within the same family.
- Consistency is Key:
- Use buttercream with a medium consistency. If it’s too soft, the colors may blend too much; if it’s too stiff, it will be harder to pipe smoothly.
- Load the Bag Carefully:
- Apply each color to opposite sides of the piping bag or use plastic wrap for easier control (see below). Avoid overfilling to maintain control while piping.
- Practice First:
- Before piping onto your cake or cupcakes, practice on a piece of parchment paper to get a feel for how the colors flow together.
- Adjust Angle and Pressure:
- Pipe at a consistent angle and apply steady pressure to ensure even color distribution in the flowers.
- Keep Piping Tips Clean:
- Wipe the tip occasionally to prevent color buildup or buttercream clogs, especially when switching designs.
Using Plastic Wrap to Divide or Switch Colors
- Prepare Your Colors:
- Spread each buttercream color onto separate pieces of plastic wrap, forming long, narrow strips.
- Roll and Twist:
- Roll the plastic wrap over the buttercream to create a log-like shape. Twist the ends tightly to seal and keep colors from mixing prematurely.
- Insert into the Piping Bag:
- Cut one end of the plastic wrap log and place it into the piping bag, aligning the open end with the piping tip.
- Switch Colors Easily:
- To change colors, simply remove the current plastic wrap log, clean the piping bag if needed, and insert a new one. This technique makes cleanup easier and allows for quick transitions between designs.
- Minimize Waste:
- Squeeze out any excess buttercream before switching colors to avoid mixing remnants in the piping bag.
By following these tips and using plastic wrap, you’ll achieve beautifully two-toned buttercream flowers with less mess and maybe a bit more control over your designs!
Conclusion
Dual-toned buttercream flowers are such a simple yet stunning way to take your cupcakes and cakes to the next level. Whether you’re piping hydrangeas, rosettes, tulips, roses, or just experimenting, the possibilities are endless. It’s all about playing with colors and having fun!
Now it’s your turn—grab your piping bags and give it a try! Don’t worry if it’s not perfect at first (mine still aren’t). The more you practice, the more confident you’ll get. I’d love to see what you create, so tag me on social media @alchemy.sweets on IG if you share your designs!
Which flower are you excited to try first? Let me know in the comments—I can’t wait to hear about your favorites!
Happy decorating!