I seed save marigolds every year from my garden, and every year the flowers that come up are a little different. That’s one of my favorite things about them. This year’s blooms have been my favorites yet! Everything from simple single-layer flowers to full, multi-layered blooms, plus some unexpected bicolors.
So I decided to translate them into buttercream, starting with one of my favorite varieties from this year’s garden. Aside from being beautiful, marigolds earn their place in the garden as companion plants and pollinator attractors, but for me they’re also there for flower study, inspiration and adding to bouquets. If you want to see what’s growing this year, check out my garden updates.
This post also shares photos of real marigolds for reference. You can find more of my garden blooms on Pinterest if you want to browse them for piping inspiration.
JUMP TO
What a Marigold Looks Like

Marigolds are composite flowers, which means what looks like a single bloom is actually many tiny flowers packed together. The wide outer petals are ray florets – the part most of us picture when we think of a marigold. The center is made of much smaller disc florets, which create that tight, textured, pincushion-like look. (In the tutorial I mostly call these “petals,” and refer to the tiny central ones as “buds” and “florets” as we build the center.)
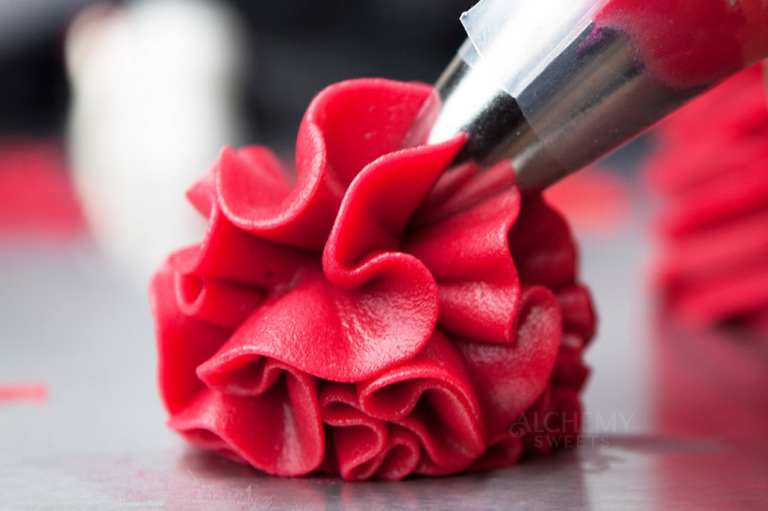
The petals vary a lot. Some have rounded tips, others are more squared-off or slightly notched, and a single bloom often mixes both across its layers. For buttercream, I use a slight lowercase “m” shape on the outer petals to get that ruffled edge, then shift to rounder or squared petals as I build inward. The shape doesn’t need to be perfectly defined; varying the size and shape of each petal is what captures the natural look of a real marigold.
Because I save seeds every year, my plants produce a lot of variation season to season. Some blooms are single-layered, with just 6–8 large petals around a fluffy center; others are full and densely layered into that classic rounded shape. I’ve even had unexpected bicolors like deep red petals edged in orange or yellow, with my favorite being orange over a bottom layer of red.
That variation is exactly what makes marigolds so fun to pipe. There’s no perfect petal count, layer number, or color combination, so let your flowers be as varied as the real thing.
What You’ll Need

- Medium Consistency American Buttercream or Faux Swiss Meringue Buttercream
- Piping tips: 103, 59s and 2.
- Piping bags
- Coupler
- Flower nail
- Gel food color: yellow, orange or red
- Toothpicks (for coloring buttercream)
- Parchment squares (optional)
- Flower Scissors (optional)
Step-by-Step Buttercream Marigold
For this tutorial, I’m keeping the setup simple: one color of buttercream, one piping bag, three piping tips, and one coupler. I’m using a Wilton #103, #2, and #59S, all from this Master Piping Tip Kit. These are smaller tips, so the finished flower is a small, densely petalled marigold that fits on a standard flower nail. If you want a larger flower, you can size up your tips and piping surface.
Before you start, it helps to picture the shape you’re building: a flattened dome, like a dome sitting on a saucer. A ruffled skirt of petals fans outward and slightly down, while the center rises into a raised, puffy tuft. The trick is in the layering. The outer petals wrap out and down, and each layer after that sits a little more upright, gradually building that rounded center.
Step 1: Build the Base

Fit your piping bag with a coupler and a #103 tip, then fill it with buttercream.
Hold the #103 tip flat on its side and, keeping it in one spot, squeeze steadily while turning the flower nail to pipe a small ring of buttercream. Pipe a second and third layer on top of the first to build up height, then fill in the center.
To create a wall around the base, hold the tip straight up against the outside of the base. Keeping it in one position, squeeze while turning the flower nail. This pipes a wall around the circles and seals the edges of the base.
Step 2: Pipe the First Layer of Petals

Using the #103, pipe a ring of petals around the outside edge of the base.
Hold the tip with the wide end pointing toward the center of the base and the narrow end up. Tilt the flower nail toward you as you pipe this first layer, this helps the petals curl down and wrap around the base, which is what gives the flower its fanned-out bottom edge.
Pipe outward, gently turning the flower nail while moving your hand up and down to create a lowercase “m” shape at the outer edge of the petal. Then stop turning the nail and pull the tip back in toward the center, tapering to a point where the petal began.
Continue piping petals like this all the way around the base, leaving about one petal’s width of space between each.
Tip: Don’t worry about making the petals perfectly even! Marigolds have a naturally ruffled, irregular look, so varying the shape and spacing will actually make your flower look more realistic.
Step 3: Pipe the Second Layer of Petals

Continue with the #103.
Pipe a second layer of petals, positioned in the gaps between the first-layer petals. These stay fairly flat, instead of holding the flower nail toward you for this layer, hold the nail more level as you pipe. This starts to lift the petals slightly and build toward that rounded shape.
These petals should be a bit shorter than the first layer, and they don’t need to be a clean “m” shape, rounder or more squared-off edges are both fine.
Step 4: Add a Third Layer

Pipe a third layer with the #103, placing each petal in the spaces between the second-layer petals.
Keep the flower nail in the same position as the second layer. Make these petals shorter than the previous layer, again with rounded or squared edges. By now the layers should be building up toward that raised, domed center.
Tip: Marigold petals aren’t perfectly symmetrical. They vary in size, shape, and there’s no set amount of them, so pipe as many as feels right. That irregularity is exactly what makes the flower look natural.
Step 5: Pipe the Center Buds

Switch to a Wilton #2 tip.
There should be a small open space left in the center of the flower. Holding the tip straight up and down over the center, pipe three small balls together in a tight cluster. This cluster is the puffy, pincushion-like center.
Then, still holding the tip straight up and down, pipe slightly elongated buds around the outside of those three balls, curving them around the cluster and making them just slightly taller. Continue for 1–2 rows around the center, depending on how full you want it to look.
Step 6: Add the Inner Florets

Switch to a Wilton #59S tip.
These florets sit between the first layer of petals and the center buds. Pipe them in small clusters of three or four so each cluster reads as one little floret.
Hold the tip straight up and down with the wide edge down. Pipe straight up, rotate the nail slightly, and repeat so the petals in each cluster interlock and form a floret shape. Then move over and pipe the next cluster of three or four, and continue until you’ve made a full ring of florets around the center buds.
These florets should sit a little taller than the center buds.
Tip: Use a slightly darker color for the florets for a more realistic look.
Step 7: Fill and Finish the Flower

Take a look at your flower and fill any obvious gaps.
If you need to tie the petal layers or florets together, switch back to the #103 and pipe a few shorter petals where needed. You can also add more #59S florets for a fuller, more textured center.
There’s no exact number of layers you need. Keep adding petals and florets until the flower has the fullness and shape you’re looking for.
Want to Make a Larger Marigold?
The same technique works for a larger flower, just size up your piping tips. Try:
- #104 instead of #103 for the petals
- #3 instead of #2 for larger center buds
- For the florets, you can try #102 or #101, though I still like the #59S even on bigger flowers
The larger tips give you bigger petals while keeping the same layered construction.
Marigold Buttercream Color Ideas
Marigolds are one of the best flowers for color play because the variation in real life is so wide and so natural-looking. Classic French marigold tones are a warm mix of fiery orange, deep mahogany red, and sunny yellow, a great starting palette to pull from.
For a single-color bloom, yellow, orange, or red gel color each work beautifully on their own. For the center, a slightly darker or more saturated version of your petal color adds depth, or use a contrasting tone to make the center pop.
You can also play with color between layers or within a single petal, which is where real marigolds get interesting. Many have a bicolor pattern, a deep red petal cleanly edged in bright gold, or a yellow petal with a dark crimson splash down the center. Try a darker bottom layer with lighter petals above it, or experiment with the kinds of unexpected combinations you might find in a garden.

Using Marigolds in Arrangements
Marigolds work best as accent flowers rather than the main focal point. Think about how they can fill space, add a pop of warm color, or help connect larger flowers throughout an arrangement.
On cakes, they work especially well in floral wreaths, crescent-shaped arrangements, and dome cakes, where smaller flowers can be tucked between larger focal blooms. They can also be clustered along one side of a cake or used to fill gaps where an arrangement needs a little more color and texture.
Their warm yellows, oranges, and reds make them especially useful for fall and autumn-inspired cakes, but marigolds aren’t limited to that season. Bright yellow and orange blooms can work beautifully in summer arrangements alongside dahlias, sunflowers, zinnias, cosmos, or other garden-inspired flowers.
Because marigolds naturally have so much variation in color and shape, they can be used to make an arrangement feel a little more abundant and garden-like without competing with the main flowers.

If Your Flowers Aren’t Turning Out
Petals losing definition: Your buttercream may be too soft. A medium consistency (which slightly firm) will help the petals hold their shape.
Petals look too thick: Your buttercream may be too stiff, or you may be applying too much pressure. Marigold petals should have some movement and variation, so focus on controlled pressure rather than trying to force a perfectly crisp shape.
The center looks flat: Build the center upward rather than simply filling the hole. The center buds should form a slightly raised, domed cluster before you add the florets.
The layers aren’t building up or look flat: As you add each new layer, the petals should gradually gain height and build toward a rounded, domed shape. If they’re staying flat instead, the next row may not have anything to sit on. Pipe a small mound or dollop of buttercream between the petals before adding the next layer—this gives the new row a base to rest on and helps lift it. Take your time with these small dollops, especially between the first and second layers, since they set up the flower’s layered height. Add them only where a layer needs a little extra lift.