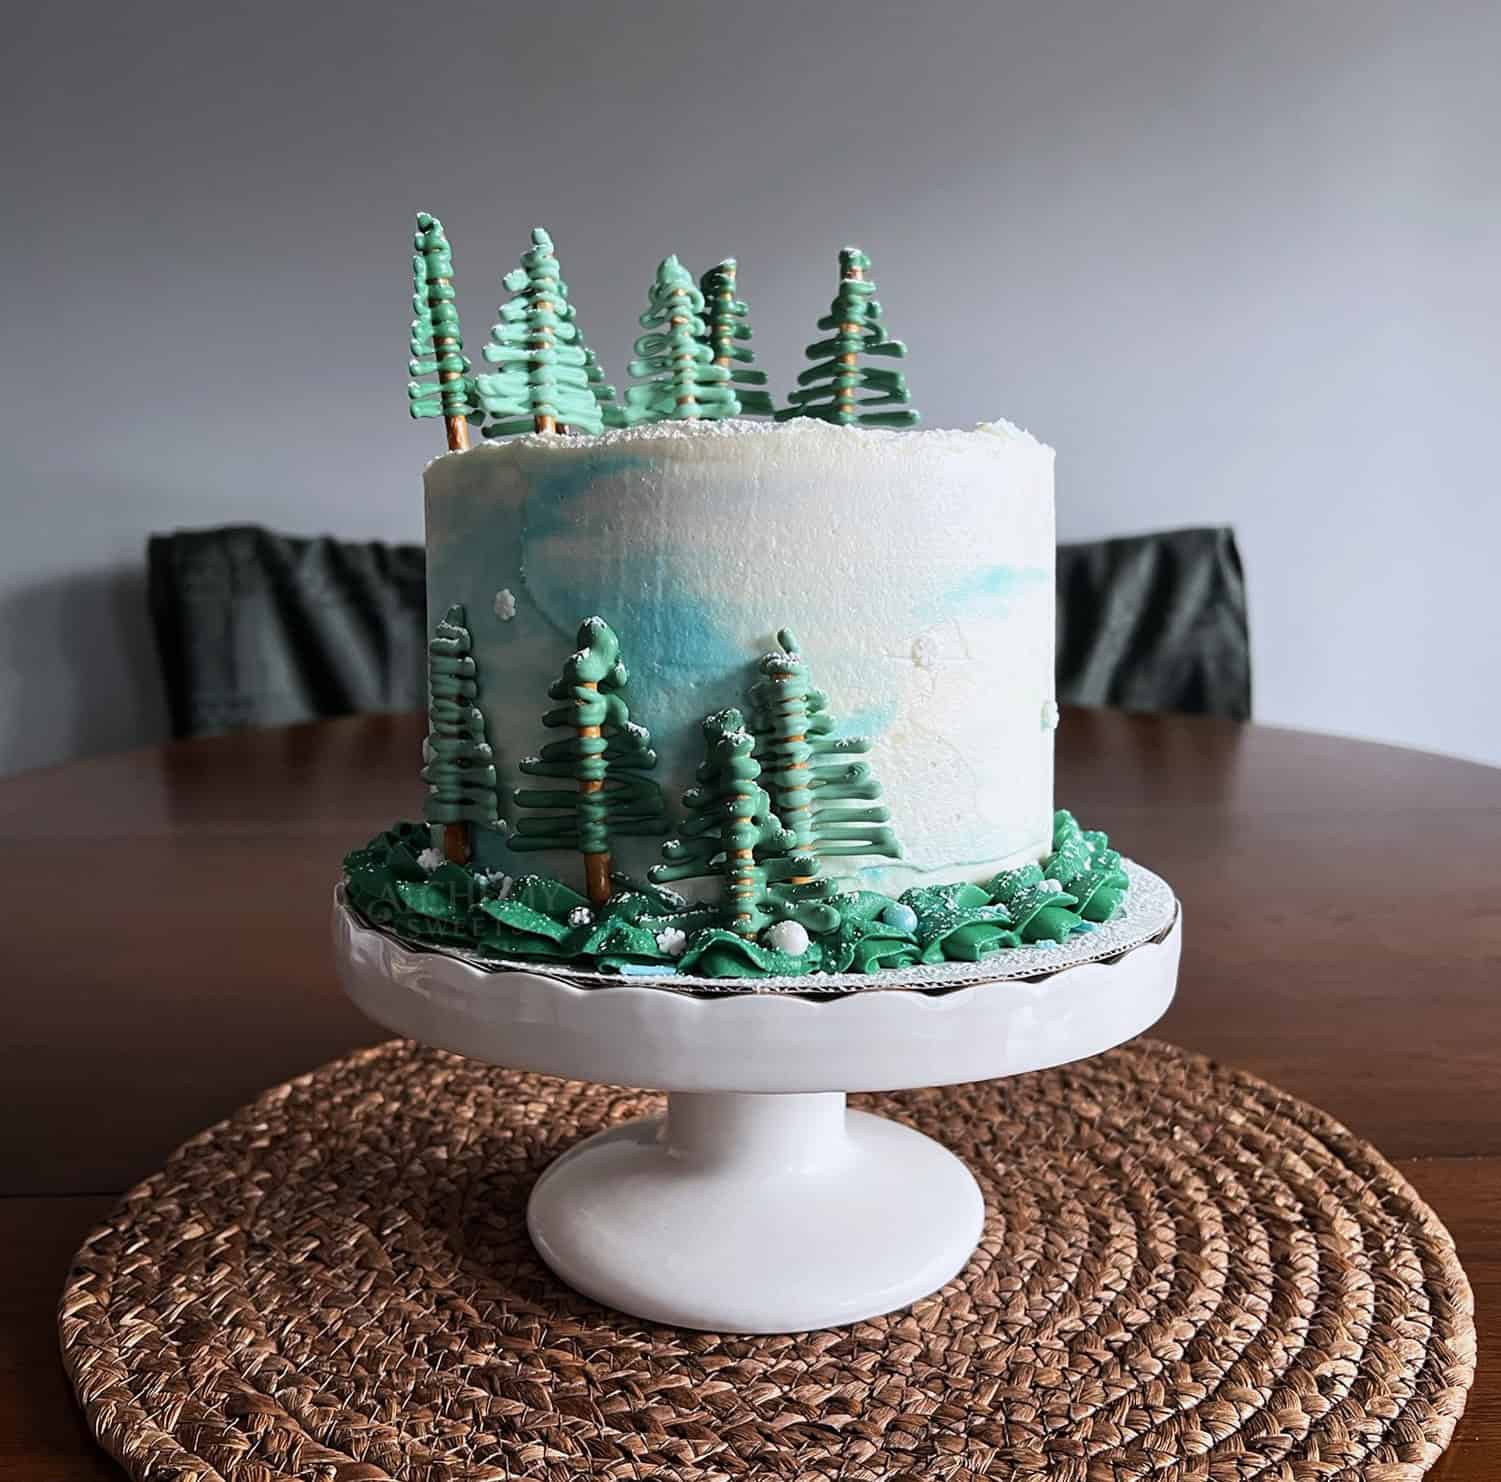
There’s something calming about the first snow on trees, the quiet, peaceful feeling when everything is covered in white. I wanted to capture that in cake form, and this Winter Forest Cake is what I came up with. It feels cozy and wintry.

The best part? This cake is actually really approachable to make. If you’re new to decorating or just want something that looks nice without a lot of stress, this is a good one to try.
Watch the full decorating process:
Table of Contents
What You’ll Need
For the Cake:
- Two 6 or 8-inch cake layers
- Buttercream frosting (2-3 cups)
- White gel food coloring
- Sky blue gel food coloring
For Decorating:
- Piping bags
- Piping tips: 1M
- Green gel food coloring
- Powdered sugar
- Silver luster dust
- Small sifter or fine mesh strainer
- Optional: sprinkles
Winter Forest Cake Decorating Process
Step 1: Prep the Cake
Bake your cake layers: I used my Pink Champagne Cake recipe but swapped the champagne for milk. Stack two cake layers, crumb coat, then chill for at least 30 minutes before icing.


Step 2: Creating the Winter Storm Effect
Start with a crumb-coated cake, chilled for at least 30 minutes.
Cover the entire cake, sides and top with white buttercream. Smooth it out to create your base layer.


Add small blobs of blue buttercream randomly across the sides and top. Don’t cover everything, just sporadic patches to mimic storm clouds rolling in. (If your blue has a green tint, add a touch of white or purple to keep it looking cool and wintry.)


Create a marble effect. Smooth the blue into the white, letting them marble and blend naturally for that watercolor, atmospheric effect.

For the top, create a spiral effect: Hold your palette knife in the center of the cake, spin the turntable, and slowly drag the knife toward the edge. This pulls the colors together in a spiral.


Intentionally leave the edges rough and textured instead of smoothing them flat, those irregular peaks look like snow drifts and give the trees a natural base to emerge from later.

Go back to the sides and adjust as needed, adding more white or blue until you achieve the winter storm effect you’re going for. If the blue looks too intense, add more white on top and blend. The marble effect is forgiving!
Pro tip: If your cake board slides around, use a small amount of buttercream or piece of tape on the turntable to secure the board in place.
Step 3: Making the Candy Melt Trees
Candy melts set fast, so work in small batches if your room is cool.

Prepare your candy melts according to package directions. I used white candy melts and dyed it in 2 shades of green to create variation in the forest, but one color works great too! (use OIL based colors).
Line a baking sheet or counter top with parchment paper. To make uniform trees, create a simple triangle template on paper. (I made mine in paint, and printed it out). Place the parchment paper over your template. The template isn’t necessary, but it’s really helpful for consistency!

Position a pretzel stick in the center of each template outline to serve as the tree’s trunk and support structure. Make sure to leave about a half inch of pretzel showing at the bottom for the visible “trunk,” and enough length at the bottom to anchor securely into your cake later—this gives them the stability to stand upright.


Fill a piping bag with melted candy melts. Starting at the top center of your pretzel stick, pipe a small star or dot. Then, working your way down, pipe the candy melts in a zigzag motion from left to right, covering the pretzel stick as you go. Follow your template outline, making each layer slightly wider than the last to create that classic Christmas tree shape (see photo for reference).


Let the trees set completely (about 15-20 minutes at room temperature, or 5-10 minutes in the fridge) before carefully peeling them off the parchment. The combination of the pretzel stick “trunk” and the inserted portion gives them the support they need to stand tall in your cake!

Pro tip: Once these are set, you can flip them over and pipe an extra layer of candy melts on the back for added stability.
Step 4: Piping the Details & Planting the Forest
With your cake chilled and the candy melt trees ready to go, it’s time for the finishing touches.
Do your best to color-match the darkest green from your candy melt trees in buttercream, it doesn’t have to be perfect! Pipe a shell border around the bottom edge using a 1M tip.
To pipe shells: Hold your piping tip at a 45° angle near the cake base. Squeeze to create a bulge, lift slightly, then pull down and release as you move forward. The motion is squeeze-lift-pull-release. Each shell should slightly overlap the one before it.


Create “pre-holes” for your trees using spare pretzel sticks, this makes it easier to insert the candy melt trees without breaking them (they can still be fragile, so work carefully!) Arrange your trees on top of the cake wherever you like. I added mine to the back side so the spiral swirl in the center stayed visible.


Add a few trees to the bottom border by sticking the pretzel into the piped green border and using extra buttercream on the back side of each tree to help adhere it to the cake side.


Sprinkle time! I used the Feeling Frosty sprinkle medley by Sweetapolita, hand-placing the larger snowflake sprinkles randomly along the sides, then sprinkling the rest over the green border and across the top.


Step 5: The Snow
Mix powdered sugar with silver luster dust. Using a small sifter, dust it generously over the entire cake: top, sides, trees, and all.


It settles like fresh snow and the luster makes it sparkly! (I would add so much more luster next time!) Just FYI; the powdered sugar will absorb moisture from the buttercream and start to ‘dissolve’ into it. Do this step right before serving for the best effect.
Why This One Works
It’s simple, sparkly, and forgiving. The marbled buttercream hides imperfections, the trees don’t need to be perfect, and that final dusting of powdered sugar and luster covers everything anyways.
I’d love to see your version of this Winter Forest Cake! Tag me on Instagram @alchemy.sweets or drop a photo in the comments below.
What flavor would you fill your forest with? Tell me your favorite winter cake combo, I’m always looking for new ideas to try out.
Happy decorating!❄️🎄