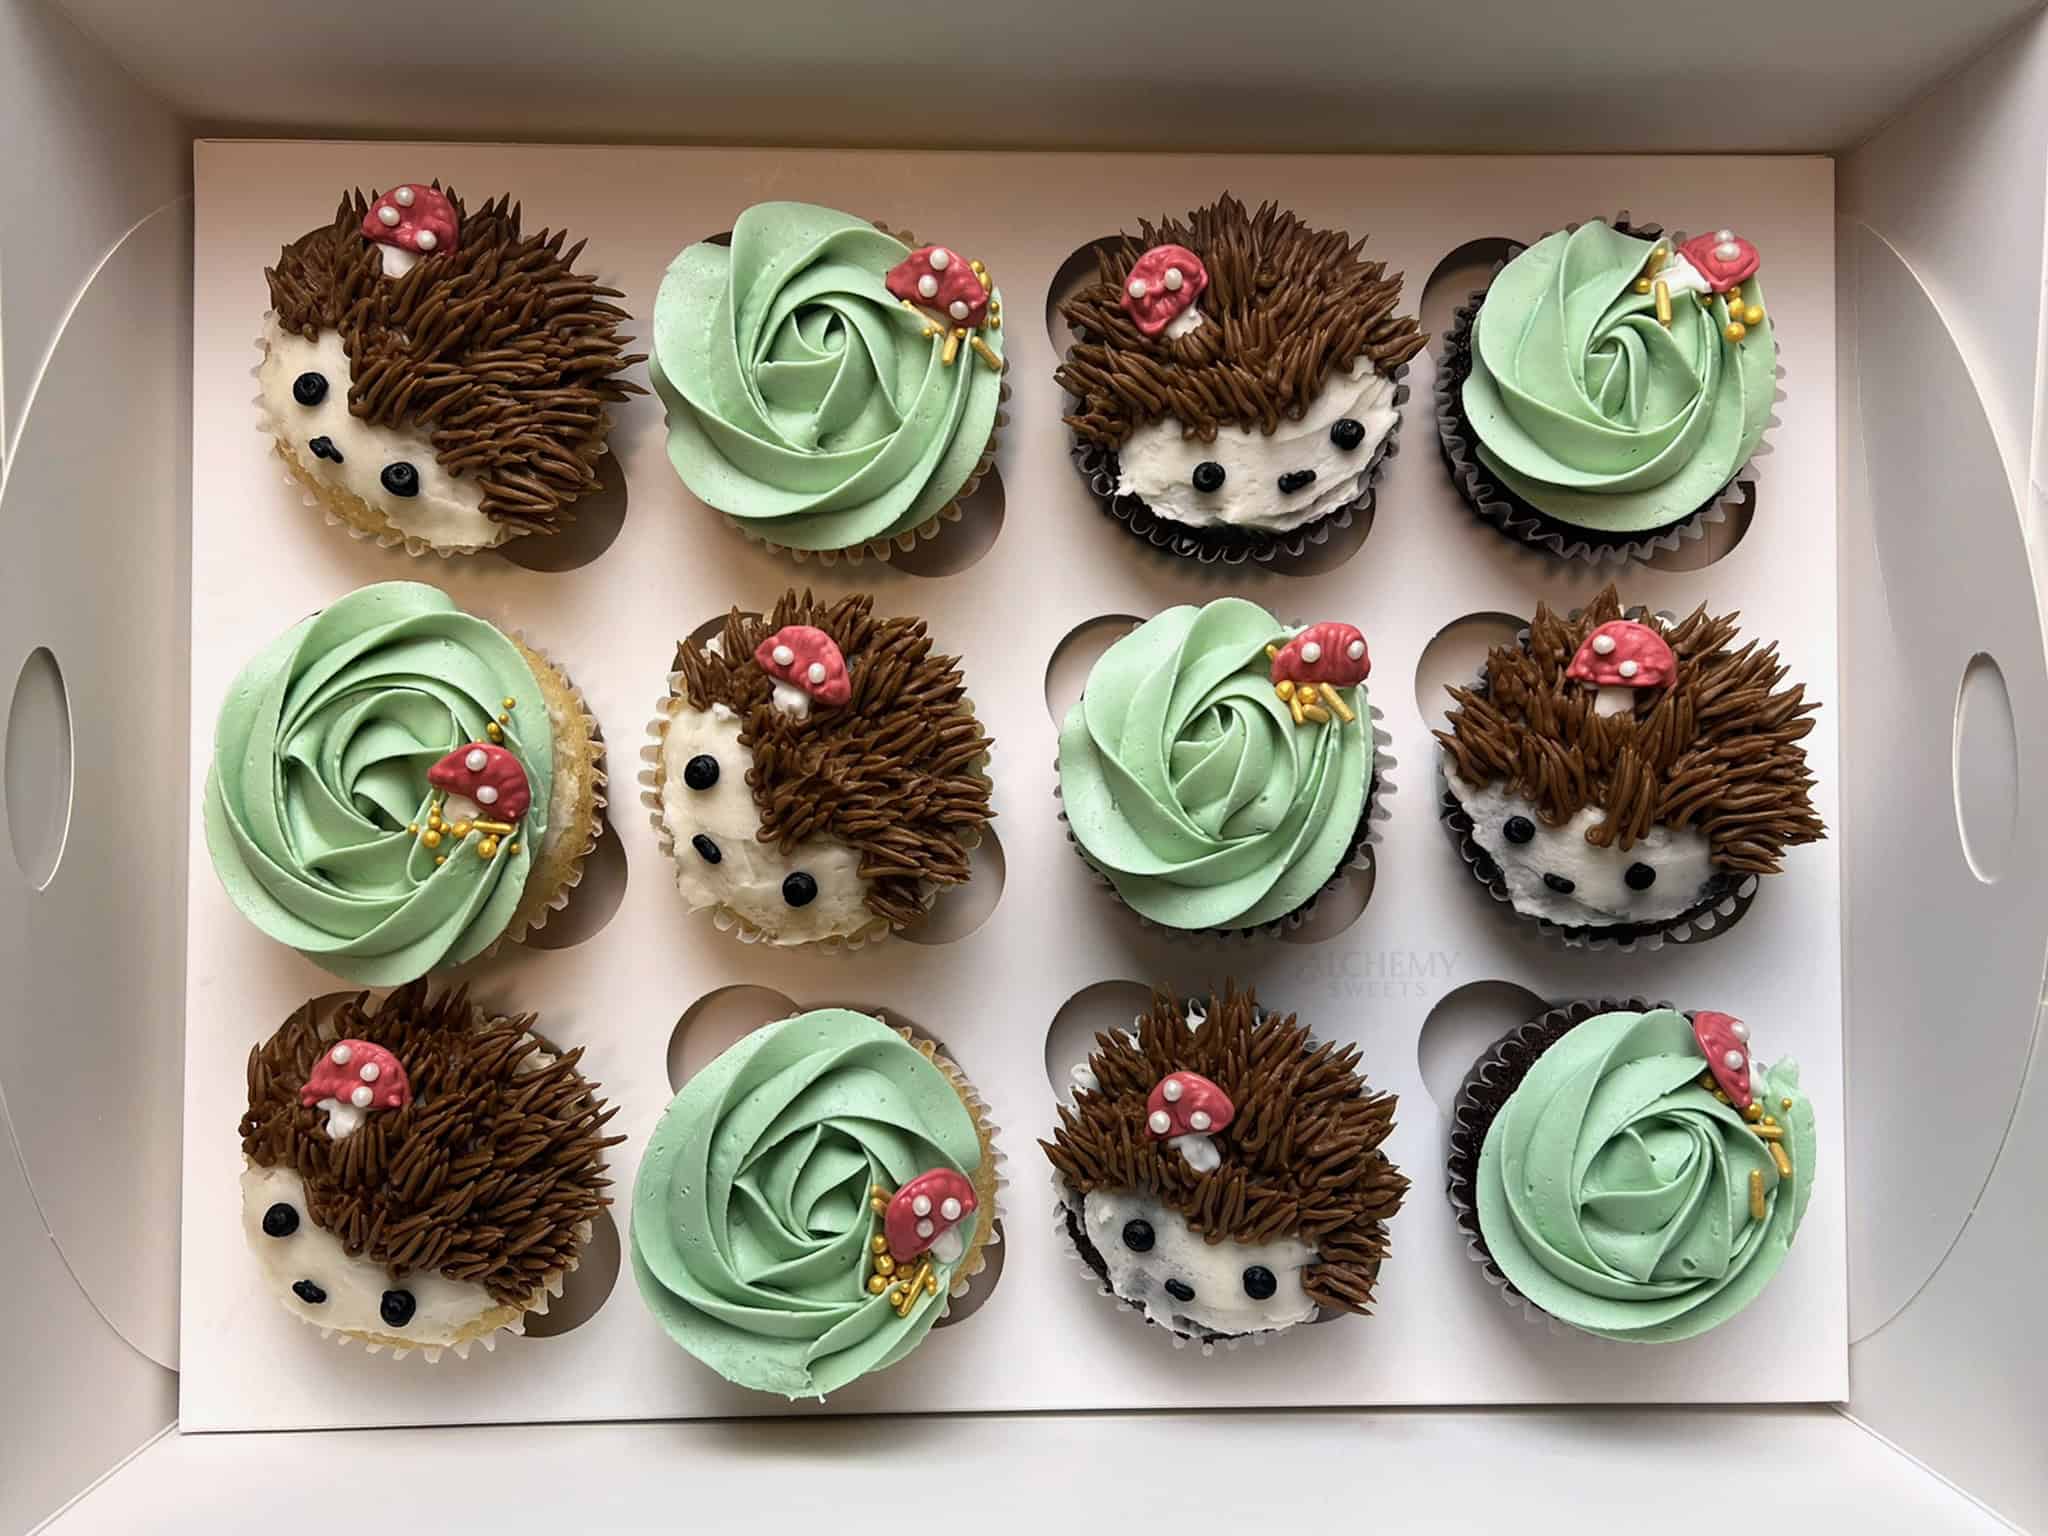
I had the pleasure of creating these woodland creature cupcakes for a baby shower celebration, and honestly, this one pushed me in the best way. The brief was forest-themed: deer, foxes, and hedgehogs, with candy melt mushrooms to round out the woodland scene. It was the first time I’d ever piped these animals, and going into it, I wasn’t entirely sure how they’d turn out. Spoiler: I’m already thinking about when I get to make them again.
The Animal Shapes
The trickiest part of this whole project was getting the animal shapes to read correctly before any texture or detail went on. With buttercream florals, the tip does a lot of the work for you, but with animals, the underlying form matters. Each creature needed enough of a defined shape that once I added fur texture and facial details, you could immediately tell what you were looking at.
I built each animal’s base shape first, then worked outward with texture, fur, spikes, ears, and saved the facial details for last. The eyes and nose, piped with a #1 tip, are small but they’re what bring the personality out. Getting those dots placed correctly made the difference between “cute woodland creature” and something a little uncanny. I learned pretty quickly that less is more with the faces, a light touch goes a long way.
The Design
Each box featured one woodland creature – deer, fox, or hedgehog – paired with matching sage green rosette cupcakes piped using a 1M tip. I built all the buttercream colors from the same brown base, which kept everything coordinated with a natural, earthy palette.


Deer Cupcakes
The deer were the most delicate of the three. To build the right softness, I used tip #18 for the fur texture, working in short strokes to mimic the direction natural fur grows. The ears were shaped with tip #352 which gave them a lovely soft edge. The color ended up being one of my favorites from this set: a warm, muted tan that felt very true to a real fawn.


Fox Cupcakes
The foxes were a fun problem to solve in terms of color. I wanted that classic warm orange without it feeling too cartoon-bright. Starting from the leftover deer color and layering in orange gave it an earthy quality that fit the overall palette. The same tip combination as the deer (#18 for fur, #352 for ears, #1 for the face), but the slightly deeper color and pointier ears give them a completely different personality.


Hedgehog Cupcakes
These were my favorite, and I think they won over everyone at the shower too. Tip #233 (the grass tip) creates the most satisfying spiky texture for hedgehog quills. The trick is consistent pressure and keeping your hand moving in one direction. The little #1 tip face at the front ties it all together. They’re surprisingly quick to pipe once you get into a rhythm, and the texture hides a lot of imperfections in the base shape, which is always a welcome bonus.


Candy Melt Mushrooms
To add a little extra woodland whimsy to each box, I made candy melt mushroom transfers as toppers. The process is similar to royal icing transfers. I made a simple template, then piped directly onto it. I piped the stems first and let them set completely before piping the caps on top, then added white pearl sprinkles to the caps while the candy melt was still wet for that classic spotted mushroom look. Once everything was fully set, they peeled off cleanly and were ready to place.
It’s a really approachable technique if you’ve never tried candy melt transfers before, the melts firm up quickly, the layering gives you a nice dimensional result, and the pearl sprinkles do a lot of the decorative heavy lifting. The mushrooms ended up being a sweet grounding element in each box, sitting alongside the creature cupcakes without competing with them.
Color Palette
For this woodland theme, I created a cohesive color story by using the brown from the hedgehog as my base for everything else.
- For the deer: I added a bit of the hedgehog brown to natural buttercream with a touch of pastel pink to create a soft, warm tan
- For the fox: I used the leftover color used for the deer and mixed in orange plus a little more hedgehog brown for a warm, earthy orange
- For the rosettes: I started with the sage green formula from my cheat sheet, using the hedgehog brown until I got the perfect shade. CHeck out my rosette tutorial.
What I’d Do Differently
As first attempts go, I’m genuinely happy with how these turned out but there are a couple of things I’d refine next time. I’d spend more time on the initial base shapes before adding texture, since I found myself compensating with extra fur strokes in a few spots. I’d also make slightly more mushrooms than I thought I needed, they were so well received that I wished I’d had extras to tuck into a few more of the rosette cupcakes.
Closing
Most of my work leans toward buttercream florals, so this was a genuinely refreshing change of pace. I loved the challenge of building something more sculptural and character-driven. These woodland creatures are absolutely going to get a full step-by-step tutorial, I want to walk through the shapes, the fur technique, and the color mixing properly when I have the time to do it right. In the meantime, if you have questions about the tips or colors I used, drop them in the comments below.
Want to see more cupcake designs? Follow along on Instagram @alchemy.sweets or subscribe to my YouTube channel for decorating tutorials and inspiration.
Happy decorating!